Welcome to my blog

I hope you enjoy reading my posts, and please leave me a comment. I always enjoy reading them, and will try to visit you in return.

For security reasons for me and for you, I would appreciate it if you would leave your name on your comments.

You are welcome to copy any of my designs, as long as you do not take credit for them yourself. I am very happy for you to sell them. If I have used anyone else's design, I always try to give credit where it is due. If I have missed anything, please let me know and I will put things right.


This is intended to be mainly about my crafting stories, as a personal record of what I do. However, I interpret crafting quite widely, not just paper crafting but other things too. I have a butterfly mind and like to change from one thing to another depending on what I feel like on a given day - knitting, crochet, cross-stitch, cards, baking and several others, including my favourite right now, parchment, both traditional skills and Groovi, very relaxing and calming to do.

I have decided to put some structure into my blog so that each day will have something of a theme.
Monday- for Mindfulness; Tuesday - Tidy Up Day; Wednesday - What's on Your Workdesk Wednesday; Thursday - Technique and Tips; Friday - Finish Off Day; Saturday - Start Something New; Sunday - Anything Goes
These themes are not hard and fast and will be changed if I feel the need.

Thursday, 30 April 2015

Clarity Stamp Challenge for April


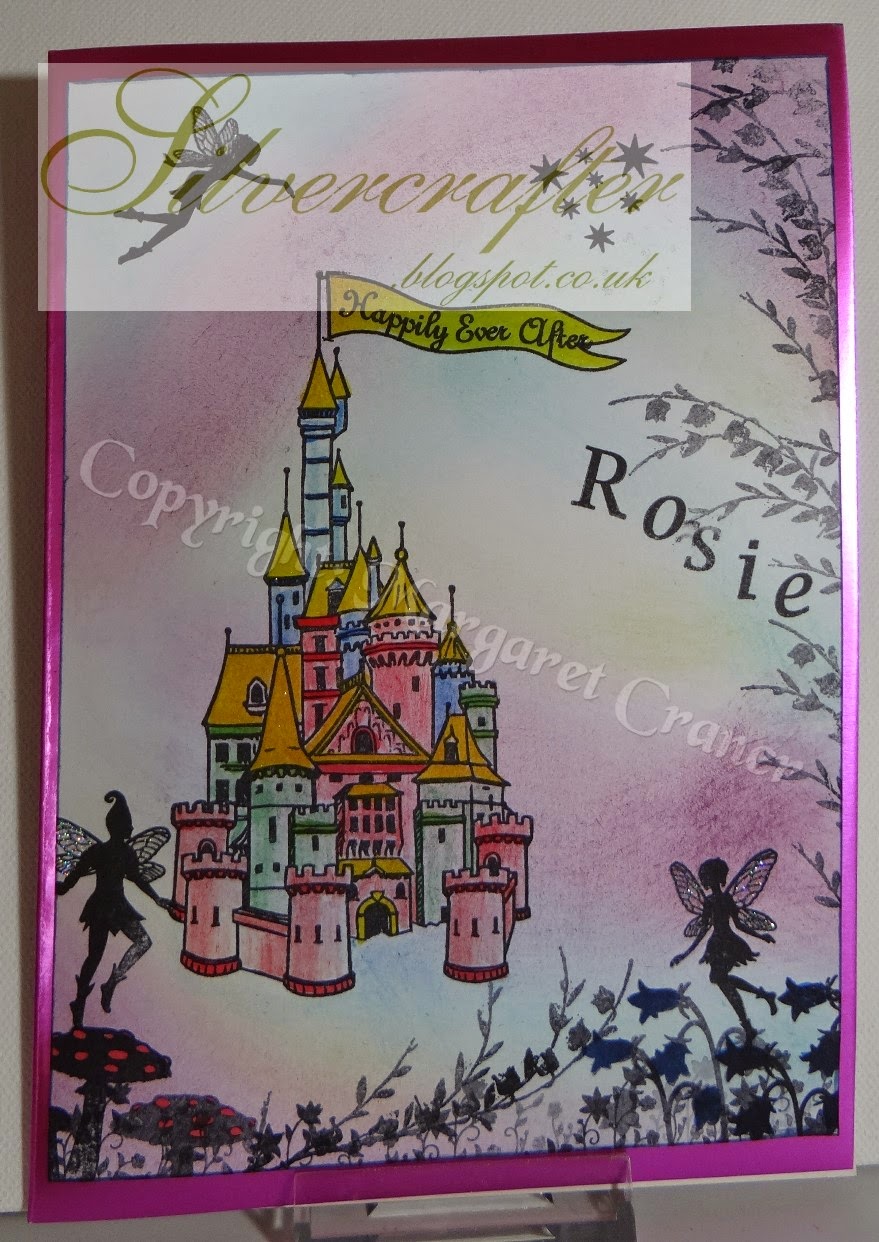
There is leaving it late and then there is going down to the wire.  I was not helped today by various people turning up late.  However, this is my entry for the April Clarity Stamp Challenge.

I have used some of the lovely Wee Fairies and Elves, mixed with the fantastic castle and hollyhocks, all on a shaving foam background, with the shaving foam being pushed through a Clarity stencil.  The background was done at one of Sazz's workshops.

I also used a mixture of Spectrum Noir pencils and Derwent Coloursoft pencils to add colour to the castle and the flowers.

I apologise for the poor photo but the battery on the camera has now given up and there is no time to charge it.

PS Forgot to say that I brushed the base card with some Dusky Concord to tone with the Dylusion in sprays in the shaving foam.

 When I posted this in such a rush yesterday, I had trouble in getting a decent photo.  However, I did succeed today so here is  the shot taken today once I got the computer to talk properly to the scanner.  It shows the bit I like best where the shaving foam and ink almost look like quilting


Saturday, 25 April 2015

I love parchment craft

As a result of Barbara Gray's promise of something to do with parchment about to appear, I got my things out to have a play. The one with the Clarity Wallflower corner on was just done on a piece of scrap left over to test out the colouring, in particular.


 The first one with the posy of pansies was from a design by Robyn Cockburn and I used the same border on the second one with the three pansies.


They were drawn by me last year with the idea of trying to create a stencil from them. I still haven't worked that idea out but I like them as a parchment piece.


  The colouring on all three was done with a mixture of Derwent Coloursoft and Spectrum Noir pencils, and was also a mixture of colouring on the back and on the front. A lot of people think you can only colour on the back of parchment, but you can get a really delicate effect colouring on the front too. 

For anyone who has been following my blog for a while, you will know that I am a major fan of Derwent products and have most of what they produce.  They are made in this country and their products have been in my life since I was a child.

I am still a fan but I have been persuaded to give the Spectrum Noirs a real test, and from that, I have decided that they are both good products and they will actually work well together.  For example, I found that the Derwent white is stronger, while the blue from Spectrum worked better than the Derwent equivalent.  So, from now on, I will be using both sets together.  They blend together and the Derwent blender pencil will also work in the same way with the Spectrum Noirs, as does the Derwent burnisher pencil.

As far as I am concerned, you cannot have too many coloured pencils anyway.

Wednesday, 22 April 2015

WOYWW 307 - I am late again

I am late again today, but at least I got here on the right day, having been missing for the last few weeks.  My only excuse is I just keep losing days and those that I find rush past so fast.

This morning was just like that.  I took my photos, all ready to post, and then got sidetracked into carrying on with the parchment work I started last night, so you can see the progress I made this morning before I realised that Wednesday was half over again.

Why is it important to post on a Wednesday, you may ask?  Well now, where have you been if you do not know what happens on a Wednesday - What's On Your Workdesk Wednesday.  I could take up this whole post explaining it all to you, but someone else has already done it much better than I ever could - the lovely Julia, who is waiting to see you all at her Stamping Ground blog.

So now, I will show you my temporary desk in front of the tv, where I can see out of the window and also keep an eye on my two mischievous dogs.

Last week, I managed to finish making, write and seal all but two cards for sending this year.  Sounds good, but it did give me a slight problem as I then found I had nothing that I had to do.  then I realised that this achievement means that I have weeks and weeks of just playing with different techniques, old and new, or a mixture of lots of things.


As you can see, I have dug out some of my parchment work, really relaxing and so pretty when it is done.  Up till now, I have done very little colouring on parchment, preferring to stick mainly to the classic white.  However, this one will be coloured, when I work out what colours I want.  

This is actually a pencil sketch I did ages ago, trying to work out how to cut it as a stencil.  The stencil idea is still waiting but I decided last night that it could look pretty good in parchment and transferred the image in white pencil on to the sheet of parchment.  The bright pink is my new embossing mat which is brilliant used on the light box.

As you can see, I have taken it a lot further today, having got totally lost in doing it after breakfast.  The border is not my own design but is one from a pansy design by Robin Cockburn, who was generous enough to share her designs on the internet.

 You can also see another piece of parching, the triangular piece on the left.  This design is a Clarity stamp that I have been playing with a lot just lately, colouring and stamping on different media and in different colours, comparing different kinds of pencils etc.  The colouring is done mainly on the back, in this case with a mixture of Derwent Coloursoft and Spectrum Noir pencils.


You can also see some of the other bits and pieces I have been playing with, including a great bookmark design from Lynne Hammond, a lovely lady with great ideas.  Most of the colouring in was done while I was relaxing in the Holiday Inn at Shrewsbury at the weekend, just the right thing to play with.

I am going to stop waffling right now and let you get off to visit some of the other people showing their desks with the help of our Julia.  I hope you all have a great week.  xxxx

Wednesday, 25 March 2015

WOYWW 303

I apologise to those that left me messages last week.  Unfortunately, life got really complicated and I am ashamed to say that I did not manage to answer all your lovely comments, although I did read them.

This week is not doing any better, and is not helped by bringing a nasty cold and cough back from the NEC.  However, it is Wednesday again so time to visit all the other WOYWW friends.


This was the state of my table on Tuesday afternoon after a session of putting cards together, some of them from the last workshop with Maria Simms at Shrewsbury.  The others are ones that I have been playing with after watching Barbara Gray and Maria demoing at the NEC last week

The following pictures have already been up on Facebook so if you have already seen them, then just ignore them this time round and nip off to Julia to see all the other desks.  They show my new stash from the show.  I am dying to get busy with my new toy, the pyrography machine from Bob Neill, but with a stinking cough I will have to be patient for now.


Just to finish off, how many of you saw a decent eclipse on Friday.  Other people in the town had a reasonable view but not me.  The thicker clouds just rolled in and obliterated the eclipse proper.  I did get some good cloud shots though.


Wednesday, 18 March 2015

WOYWW 302

I was so determined to keep up to date on Wednesdays this year, but that resolution definitely took a dive early on.  I wish I knew where this year is flying off to, we are nearly a quarter of the way through 2015, which is really frightening.

I will keep it short and sweet this week and I will try to get round a few more desks too.

For those who wonder what is going on and why I should be showing you a right mess on a picnic table in front of the TV,  I can only refer you to our esteemed leader, Julia, at Stamping Ground, who will explain WOYWW far better than I can.

This is my working table photographed in the sunshine on Tuesday afternoon, but it is not much different so far today.


I have been busy, mounting up the four projects completed at Sally-Ann Hanes workshop from the weekend, so you will see those to the side.

In the centre are a few toppers created while playing with a couple of new sets of Clarity stamps, all ready to be mounted for use.

There is also my newly resurrected pot of Grunge Paste with which I have just started a new project on a canvas board, which I will show you next week, once it is finished and delivered to the recipient.


I will let you leave now and send you off  to see if Julia has the kettle on for refreshments on your way to visit all the other desks on show this week.  Have a great crafting week.

PS Is anyone going to the NEC this week?  Hope to see some of you there.

Monday, 16 March 2015

Clarity Stamp Challenge March 2015 - Anything but a card

If this theme for a challenge had come up a few months ago, I would just have ditched any idea of taking part.  However, I think many of us are starting to take our card making further into canvases and boxes and coasters, things that we can display around our homes.  We have been encouraged, dragged and kicked down that route by some of the beautiful tools that have been presented to us and all the fantastic inspiration of Barbara Gray and her fabulous Design Team.

I very deliberately avoided looking at any of the wonderful things from the Design Team as I wanted my inspiration to come from within me and I had ideas anyway.

It just happened that my youngest granddaughter's birthday falls this month and I found just what I wanted at an excellent local craft store, Pink Tulip Creations Ltd at Spernal in Warwickshire (just down the road).  It was a little wooden box in the shape of a book.

It also just happened that Barbara Gray had showcased her beautiful Wee Fairies and Elves on Create and Craft at the start of the month.  So for a four year old, the castle and the fairies had to be put together for this project.


It took a while to work out how to prepare and do the initial painting as it was the first time I had done anything like this.  I tried inks but soon came to the conclusion that I would never get the effect I wanted that way, so settled on watered down acrylics, pale blue in the top half blending to pale green at the bottom.  I think I used at least three coats to cover it properly, then I left it to dry overnight.


The following day, I set to work with the Wee Fairies, Elves and the Castle, stamping them with Archival Black.  Because of the slightly rough grain of the wood, I got a slightly distressed effect from the stamping, which I preferred to a smooth version.  The castle in the centre was stamped and inked on Theuva card and put behind the removable glass (designed for a photo).


Once all the painting was finished and thoroughly dried, I used the Crafters Companion Spray and Shine to seal it and give it some protection.  I sat out in the conservatory in the sun with the box balanced on one hand while I sprayed and turned each side in turn to the sun to dry it off.  Good thing no-one came to the door while I was doing it  as I could not put it down until it was dry.


Then I had to possess my soul in patience until the lacquer was thoroughly dry and hardened off before I could put the inserts back into place.  That was hard as I am not a desperately patient person.  I wanted it done right then.


The card was also covered with the castle and fairies.  I already had the background done from when I was filling in time at a class, waiting for everyone else to get to the right stage to continue that project.  

So all I need to do was the stamping of the images and colour them in with Derwent Coloursoft pencils which blend so beautifully.

As you can see, I have just learned to put watermarks on all my pictures to give my designs some protection so I hope you can see everything through them.

Ingredients
Wooden box (Pink Tulip Creations Ltd)
Wee Fairies (Clarity Stamp)
Wee Elves ( Clarity Stamps)
Castle (Clarity Stamps)
Letterbox Stamps (Clarity Stamps) 
Theuva Card (Clarity Stamps)
System 3 Acrylic Paints
Derwent Coloursoft Pencils
Crafters Companion Spray and Shine

Rosie was supposed to get this last Saturday, but the arrangements were changed at the last moment, but I am hoping that she will see it for real later this week.  I am off now to link this post up to enter the Clarity Stamp Challenge before March disappears completely.

Grunge paste problems

If your Grunge Paste starts to get a bit too thick to spread, don't throw it out.  Just add a little water and mix it in well.  Put the lid back on and leave for a while.  Go back to it and mix and add a little more water if needed.  Repeat this until it is back to a lovely creamy consistency.  I had a brand new jar, which, when I opened it at the class, was totally solid, obviously the lid was not on properly.  Sally-Ann Hanes gave me this method of reviving it and my jar is now just ready to use.

Joy Steels has already messaged me about this and she always gives her pot of Grunge Paste and quick spray of water when she has finished just to overcome the drying in the atmosphere.  That sounds like a great tip to me.   Thank you, Joy.  xx

Wednesday, 4 March 2015

WOYWW 300 - what an achievement!

Congratulations to our fabulous hostess, Julia, for looking after us for 300 Wednesdays, giving us such great hospitality.  For those who have been in the darkest jungle, WOYWW stands for What's On Your Workdesk Wednesday.  Julia will explain it far better, but it the day when folks from all over the world come together and show each other what we have on our desks.  Messy desks are especially welcome as they give us more to look at.

My desk today is uncharacteristically tidy.  I was ready to start a completely new project so I just swept the space clear, leaving out just what was needed.  The main event is hidden under the paper, but you can see the Floral piece I did for a challenge/


The second shot shows more of what is going on, a brand new set of gouache paints all ready with brushes.  This piece is for a challenge to celebrate the life of Jane Crosby, who died last year.  The idea is for us to take inspiration from her crafting and to, hopefully, pass that inspiration on to others.  With that in mind, I decided that I would face up to my demons which have been with me since I was told at school that  I was rubbish at art.  This is the first attempt at painting since that day.  I have no idea what I am doing, no knowledge of the skills, so I am just trying things out.  I will blog this project at a later date.


I had to show you this shot of my littlest dog, Gemma, who is totally disgusted with me today.  As she was disgustingly and stinkily sick last night, she is being starved today and, as you can see, is taking a very dim view of it.


Julia does like us to be fairly brief on a Wednesday so I shall leave you with a teaser from my painting project - just one tiny corner.   So now I will wish you all a very Happy 300th WOYWW and leave you to visit all the other desks on show at Julia's Stamping Ground.  Come along and join in with us, show us your desk and visit as many as you can find time for.  We would love you to leave comments as you go.


Saturday, 28 February 2015

Clarity Stamp Challenge, February 2015 - Floral

There is nothing like a bit of serious pressure to concentrate the mind. 

This month's challenge from Clarity Stamps had the theme of "Floral".  Easy, peasy, you are saying.  I can hear you.  I wanted to go down a different route, and have really tried hard not to look at any of the other entries for this month, to avoid any influence from other talented crafters who were more organised than I.

I have done quite a lot of parchment work in the past but not really since last summer.  It is a craft I take away with me as it is a "clean" craft, with no risk of spilling ink etc onto someone else's precious fabrics.

After a lot of cogitation and turning at night, I woke up a week ago with the germ of the idea, but not really sure how it would work.  I wanted to use the Chrysanthemum stencil and use embossing techniques.  I tried tracing through the stencil but that was not practical as the pencil would not fit into the tighter areas, so I tried brushing through with Wild Honey and Aged Mahoghany to give me the guide.


 I embossed from behind to push the colour forward into prominence, then pricked and snipped round it to remove it from the rest of the parchment.

I decided not to make it into a card but to mount it onto one of the Clarity canvas boards.  I masked off the edges of the board then brushed through with Cracked Pistachio and Wild Honey to give a strong background, but still leaving a clean white border.


Once the inks were dry, I brushed a layer of Mod Podge all over to seal it and to avoid too many finger marks.


I used parchment glue to mount it, leaving the petal edges free to throw shadows.  Now all I have to do is to do the entry bit and I can get on with another of the projects I have been procrastinating about, not to mention a few birthday cards that are overdue.

Saturday, 31 January 2015

Weeked Funnies for you.

While going through email archives, I found these gems and thought I would share them with you all.

 
QUESTIONS THAT HAUNT ME!

Can you cry under water?

How important does a person have to be before they are considered assassinated instead of just murdered?

Once you're in heaven, do you get stuck wearing the clothes you were buried in for eternity?
Why does a round pizza come in a square box?

What disease did cured ham actually have?

How is it that we put man on the moon before we figured out it would be a good idea to put wheels on luggage?
Why is it that people say they 'slept like a baby' when babies wake up like every two hours? 
Why are you IN a movie, but you're ON TV?

Why do people pay to go up tall buildings and then put money in binoculars to look at things on the ground?


Why do doctors leave the room while you change?
They're going to see you naked anyway...

Why is 'bra' singular and 'panties' plural?

Why do toasters always have a setting that burns the toast to a horrible crisp, which no decent human being would eat?

If Jimmy cracks corn and no one cares, why is there a stupid song about him? 
Why does Goofy stand erect while Pluto remains on all fours? They're both dogs!

If corn oil is made from corn, and vegetable oil is made from vegetables, what is baby oil made from?

Do the Alphabet song and Twinkle, Twinkle Little Star have the same tune?

Why did you just try singing the two songs above?

Did you ever notice that when you blow in a dog's face, he gets mad at you, but when you take him for a car ride, he sticks his head out the window?
Why, Why, Why
do we press harder on a remote control when we know the batteries are getting dead?
Why do banks charge a fee on 'insufficient funds' when they know there is not enough money?
Why does someone believe you when you say there are four
billion stars, but check when you say the paint is wet?

Why do they use sterilized needles
for death by lethal injection?

Why doesn't Tarzan have a beard?

Why does Superman stop bullets with his chest, but ducks when you throw a revolver at him?

Why do Kamikaze pilots wear helmets?


If people evolved from apes, why are there still apes?

Why is it that no matter what colour bubble bath you use the bubbles are always white?

Is there ever a day that mattresses 
are not on sale?

Why do people constantly return to the refrigerator with hopes that something new to eat will have materialized?

Why do people keep running over a thread a dozen times with their vacuum cleaner, then reach down, pick it up, examine it, then put it down to give the
vacuum one more chance?


Why is it that no plastic bag will open from the end on your first try?

How do those dead bugs get into those enclosed light fixtures?

Why is it that whenever you attempt to catch something that's falling off the table you always manage to knock something else over?

In winter why do we try to keep the house as warm as it was in summer when we complained about the heat?

How come you never hear father-in-law jokes?

And my
FAVORITE.........
 

The statistics on sanity is that one out of every four persons is suffering from some sort of mental illness. Think of your three best friends -- if they're okay, then it's you.

Wednesday, 28 January 2015

WOYWW 295

 On this WOYWW day I do not really have a desk photo here at the moment, largely as it is no different from last week and my camera batteries are both flat.  Sorry Julia.   I will do better next week.    However, I did promise to show the results of what I was doing last week, so I hope you will forgive me today.

Several of you noticed this fairy hiding on my desk.  She is unrepeatable in this format as her background is just a piece of watercolour paper used to mop up excess ink on the mat at the end of a workshop.  I did two and thought the first one would be the better bet, but in the end, I was wrong.  This second piece just jumped out at me the other day as being the perfect background for this Lavinia fairy.  Then I mounted her on black and then pale cream and left her alone.


The second piece of work is a canvas, following on from the lovely card made at Pink Tulip a couple of weeks ago.  It is an A5 canvas board which I then mounted onto the next size up once it was finished.  Most of this went well until I just took it one stage too far.  I could hear Barbara Gray shouting at me to leave it alone but I stupidly ignored her and messed it up.


I had done the background, dried it out and added the shaped leaves, when I thought it would be good to have a branch to hang the leaves off.  Sounded a good idea to me, but I chose the wrong ink and it became very harsh and in your face.  I thought it was all over and it was headed for the bin.  In that position, it did not really matter what I did and overnight I decided to get out my trusty Coloursoft pencils and see what I could do.  The lightest of the skin colours proved to be the saving of my disaster when I added it on top of the dreadfully dark tree branch.  At that point, I did actually put my signature on it and breathed a long sigh of relief.

I hope that if you have arrived here by surfing the internet you will come back again.  Also, please make sure you visit our Julia at Stamping Ground, who will be very pleased to see you and pass you on to all the wonderful desks on show.

Wednesday, 21 January 2015

WOYWW 294

Thank you for coming to visit today.  As most of you know, Wednesday is the day of our weekly blog hop, courtesy of the wonderful Julia at Stamping Ground, who is our friendly host for the day.  It is the day when we all show what we have on our desks, tidy or not.  Hence the mess you see before you here.
I have been playing with Brushos this week and what you see here is part of the results of that inky fun.  The fairy background is just a piece of watercolour paper, which I had used to mop up the left over paint on the mat at a workshop.  I like to collect pieces like this as they often produce interesting backgrounds for use later.  Now I have to find the right backing to finish it off.


I have also been playing with the new canvas boards from Clarity, and finally finished one reasonably successfully.  However, I am holding that one back for the moment, as I need it for the #ArtChain which is running on Facebook at the moment, so it will appear later this week.

I am keeping things short and sweet this week.  I hope you are not all snowed in, but take care on the icy roads out there at the moment.  Stay warm and safe, all of you, and now it is time you went back or over to Julia's to see some of the other desks on show.

Sunday, 18 January 2015

First tryout of the Brushos

I was determined to have a go immediately, having found my little box of the Brushos.  Being awkward, I did not watch any of the varying videos out there.  All I had was the beautiful art work I have seen from many of my Facebook friends, who are so inspiring.  So I just grabbed the little pots and poked holes in the lids, and with a water spritzer, dived in.

 This was the result of an evening of inky fun, and I sure was very inky.  Baby wipes are just not big enough, but you can see three there which will get used for a background for something at some stage - I do have ideas.

Two of the larger pieces (all Gelli card) speak to me of some kind of landscape, but they are for another day, when my ideas are sorted.  However, the two small ones were easier to work with today.


This first one looked to me like bright flowers through a very rainy window, which is why I chose to stamp these fantastic raindrops over the top.  I have yet to find suitable mounting card so that is for another day.
 
 This second small piece definitely looked like a landscape and I had actually intended something like this, so I was really happy to find some tiny measure of control.  The basic view was there, but I just enhanced parts with Derwent Coloursoft pencils, blue in the sky and green to bring out shadows of the trees and anchor them in some way.

The tiny trees just happened to be in front of me on my table so they were the obvious ones to use.  They are part of the remountable Tuscan set from Clarity.  I added the birds as I felt it needed something in that central sunny area.

I was told I would enjoy playing with these and I certainly did, and I will be going back to them and trying to learn a little more control and find out just what I can do other than just random backgrounds.

Hope you like them  They are fun.

Saturday, 17 January 2015

Lovely design from Pink Tulip Creations

This is my second post of the evening so I hope you will forgive me for that.


Pink Tulip Creations is an excellent craft shop very local to where I live and with a good class area.  I started going down there not long before Christmas and they are so welcoming and with a lovely group of ladies each week.

This week's card was designed by Angela Crompton.  Her original design included a sentiment at the bottom.  However, I thought I would like to actually frame and hang this one, so I left the sentiment out.  This actually led me to do some more character building, as Maria Simms would tell me, as I had to emboss and cut extra leaves.

The colours on the base card were a random mix of Picked Raspberry (or Pickled Raspberry as everyone, including me, tries to say), Wild Honey, and a green, which I cannot remember and the dog has eaten the paper.  The leaves and the fantastic drops are, of course, from Ryn, which Pink Tulip sell.  The script in the background is a Clarity stamp, part of the Journalling set.

After I had finished, I felt that I needed more darkness around the edges, and there ws still a lot of Aged Mahoghany on the brush from the previous day, and I think that was just enough to finish it off.  After removing a little ink with a mister and kitchen roll, I decided I had gone a little too far, so brushed a little more Picked Raspberry into the paler areas.

The leaves were stamped in Versamark and embossed in gold detail, and then coloured with Distress markers matching the base colours.  Then they were shaped and fixed in place with Pinflair Glue Gel to keep their raised shape.

Now I just need to find a frame and a suitable mount to fit this, and I will hang it.

I did say I would show you my first attempts with the Brushos today, but I reckon that three posts in one day is a little too much so I will write it now and post it tomorrow.


Maria's card number 4 from Shrewsbury

If you read my previous post from Monday 12th January, you may have seen that I completely messed up the final card of Maria Simms' Workshop at Shrewsbury, with rather a lot of ink in the wrong place.  There was no time to start right from the start that day, so I just photographed what I should have done and packed up for the day.

Maria's intention was that the topper should be on an angle, and I am in the middle of redoing this design as originally intended.  However, I had to cut so much away that it did not look right that way.  So I went for more character building and spent a lot of time cutting the whole thing out, going round all the leaves and acorns.

Before sticking it down on the Gelli card, I realised that the whiteness of that card needed toning down a touch, so I just brushed lightly with what was left on my brush of Wild Honey.  I also put post it notes round the edges and sponged a border of Aged Mahoghany, before sticking the whole card together.

All the stamps are from Clarity and I love that ribbon Thank You, with all its alternative reasons for the thanks.

I hope you like what I have done with this one, Maria, after making such a mess to begin with. 


Wednesday, 14 January 2015

WOYWW 293

Hope you are not all marooned by the ten foot of snow that was forecast by the doom laden panickers.  Before you all shout at me, I do realise that some of you might have a lot of snow and I am probably tempting fate, but, hey, it is winter and we do have weather in this country.  A snowy day is a good crafting day.

Not a lot to see here as there has been a major tidy up down here.  This is not my real desk, just the overflow but at least I can see most of the floor in here now.  Well, I could last night, which is when this picture was taken.  

Some of you who have come from other areas than Julia's welcoming blog,  may now be wondering why on earth I should show you a picnic table with ink pads and a stamp folder on, not to mention a part bottle of Vodka and a tot glass etc.    Just follow this link to visit Julia who will explain it so much better than I can.

I am still cataloging all my stamps, having got most of them now into sensible groups in albums.  All my trees are now together, all my people in another folder and so on.  The sharp eyed will notice that the leaves on my Clarity stamp album have changed colour, partly because it helps to find a given file, partly because it looks pretty and partly because I was bored one day and had a load of Promarkers to hand.

The vodka is actually for crafting purposes, to add to ink misters to prevent the contents going off.  The glass was full of Heather Cream (a Baileys taste alike but lighter) and the ink pads came in a special off from Clarity and are just waiting to go back up to the craft room proper for putting away.

I hope you all get the weather you need for whatever you want to or have to do.  Take care on any ice and have a good day.  Now, it is time you trotted back to Julia to see what other desks are on show over there.

Have fun!

Monday, 12 January 2015

If I had a brain, I would be dangerous.......

 Saturday was the first of Maria Simms'  Clarity workshops for 2015 up at Shrewsbury.  It was a great day with lovely projects and great company and an excellent tutor.  Maria had set us four new projects to complete, so she was definitely wielding her whip.  (She had also looked at the list, saw my name and put in a load of cutting out). 


The first one was the new owl stamp, teamed up with the acorns and oak leaves from the Stage remountable set.  The owls are not on the front of the card but stamped and embossed and put through the aperture, which we cut through three layers in the front of the card.  The pearlescent topper was embossed first before putting it onto a backing of black.  Then we had to stamp and emboss the acorns and oak leaves and they were then CUT OUT and layered on the front of the card.  I was doing fine until a very kind gentleman came in and told me I had left my headlights on.  so I didn't have time to finish putting the leaves and acorns on the card.  I tucked them away safely (Ha!) in a sealed bag, but when I came to stick them on this morning, I could only find six instead of the eight I should have had.  They did eventually emerge from hiding.  I really like the simplicity of the design, classic!


When this stag came out, I really did not like him at all and didn't want him.  As often happens, when you start working with a stamp like that, you suddenly get an appreciation of just what you can do, and it totally changes your feelings.  I even dealt with the fact that I had to CUT a mask - Maria said it was character building.  As you can see, my oak leaves are very varied in colour.  I had a problem with the reddish colour to start with and really then just stamped without a lot of planning, with a lot of overstamping to try to tone the red down a little.    So I was expecting that I might need to redo this totally when I got home.  However, now that things have settled, I quite like the more random effects.  It could even be the Sam Crowe effect?


This third card has cost me more money.  I was told today that the clock face is a Tim Holtz die which is now out of production.  However for those who are interested, I did find it available on Amazon  http://www.amazon.co.uk/s/?ie=UTF8&keywords=tim+holtz+weathered+clock+die&tag=googhydr-21&index=aps&hvadid=40259688486&hvpos=1t1&hvexid=&hvnetw=g&hvrand=2671271138237691499&hvpone=&hvptwo=&hvqmt=b&hvdev=c&ref=pd_sl_5v9vzl6ll9_b
and it comes with free postage.
 

The  main topper was on craft card and I used Sam's Eggs (fantastic stencil) again to add the background.  Because we were running short of time, we had the choice (decided by Maria) as to whether we put the words on the background or missed that bit.  I chose to leave all the finishing off and putting together until today.  I also chose to add a hint of gold gilding wax to the clock and to the edge of the topper - the pot was right on the table next to me, so what else could I do?

The final card is not pictured here because it was an unmitigated disaster through my own stupidity.  Having done all the stamping, I picked it up and dropped in in a hurry in horror.  The acorns were in second generation ink, so it was ink, blot, plot.  Fine but where had I blotted?  Oh yes, right along the edge of my precious card, and to make it even worse, I had added inky smudges to another corner.  absolutely no chance of resurrecting that one.  Start again, Margaret.  That is tomorrow's project.  My daughter said,"Oh well, Mum, you will know not to do that again".  Little does she know, it is not the first time and probably will not be the last.

Hope you enjoy looking at these cards, all designed by the lovely Maria.

Friday, 9 January 2015

Things with Wings - You can never have enough butterflies


"Things with Wings" is the title of this month's Clarity Stamp Challenge for January.  I had several ideas but I am going with this one, which I did this morning in the class down at my local Craft Shop - Pink Tulip Creations at Studley.

This was my version of the class card, but I used all Clarity products as you can see.
Ingredients
Gelli Card
Distress ink pads - Scattered Straw, Wild Honey, Faded Jeans and Broken China
Stencil - Sam's Eggs
Black Versafine
Clarity Stamps - Small butterfly,  Small Allium Head, Long Grass, and the Butterfly verse
Distress markers - same colours as the ink pads
 Clarity Stencil Brushes
Quickie Glue pen and Glamourdust

The inking of the card started from the centre with the lightest colour and gradually working to the edge where it was the darkest.  I used Sam's Eggs (really loved using them, Sam Crowe) to give the texture feel in the centre, both in the yellow centre and more lightly on the blue, always brushing from left to right.

Then, using Versafine, I stamped the verse (love this one and so apt) and the little Allium heads, first and second generation ink, and the tops of the Tall Grasses around the edge.

The butterflies are actually stamped on separate card (I used those little Gelli centre cards - I love those), coloured in and cut out.  This was where I was not too sure that I had picked the best butterfly (many of you know how much I love cutting out and this is really quite tight at the bottom of the wings).  The original design used just two colours, more as a wash over the butterflies, but I gave myself a bit more work by going in to all the little areas with the Distress pens.

The main topper was then mounted onto white card and the butterflies mounted on top of that.  I bent the butterflies before sticking them to give them some shape and movement and then added a little Glamourdust to highlight them.

I have not used Versafine very much until today but I was impressed how well the combination of that with the Clarity stamps worked.

Apart from the cutting out, I really enjoyed myself.  I love blending ink and stenciling and colouring in.  I could sit and colour in all day quite happily.  I need to play more with the Distress pens to sort out blending one into another.  More time needed, as always.

PS Can anyone find the bit I forgot until it was too late?  No prize, just satisfaction, sorry.

PPS  I am also entering this card in the challenge over at  craftingforallseasons.blogspot, where the challenge at the moment is "Things with wings"