Welcome to my blog

I hope you enjoy reading my posts, and please leave me a comment. I always enjoy reading them, and will try to visit you in return.

For security reasons for me and for you, I would appreciate it if you would leave your name on your comments.

You are welcome to copy any of my designs, as long as you do not take credit for them yourself. I am very happy for you to sell them. If I have used anyone else's design, I always try to give credit where it is due. If I have missed anything, please let me know and I will put things right.


This is intended to be mainly about my crafting stories, as a personal record of what I do. However, I interpret crafting quite widely, not just paper crafting but other things too. I have a butterfly mind and like to change from one thing to another depending on what I feel like on a given day - knitting, crochet, cross-stitch, cards, baking and several others, including my favourite right now, parchment, both traditional skills and Groovi, very relaxing and calming to do.

I have decided to put some structure into my blog so that each day will have something of a theme.
Monday- for Mindfulness; Tuesday - Tidy Up Day; Wednesday - What's on Your Workdesk Wednesday; Thursday - Technique and Tips; Friday - Finish Off Day; Saturday - Start Something New; Sunday - Anything Goes
These themes are not hard and fast and will be changed if I feel the need.

Sunday 31 March 2019

Sunday is anything goes

Rather late on the scene today, but we did lose an hour's sleep overnight.  That is my excuse and I am sticking to it.  More about my day later, as I did promise that I would try to do an update on Thursday's blog today, so here goes.  

There are a lot of photos this time, but I hope it will help you to understand how I worked.  I will tell you now that, despite a lot of care, when I got round to the point at which things should have joined up, I was fractionally out and had to fudge it a bit.  With care and patience, you can get away with it, especially if you put the bit that is slightly out at the bottom of your finished piece. Some of the photos need a bit of peering at to see where we are, but if you click on them to bring them up, that should help.

Before sticking it down, rub the back of your parchment with a tumble drier sheet, to lubricate it when you turn over to do the embossing.

This is the important start, where you need to anchor the parchment very firmly to the plate mate.  (what is the ideal number of Groovi tabs to use each time - however many it takes to avoid movement. ) I would advise you to use an A4 piece of parchment as it is so annoying to suddenly realise your hard work is lost because it will not fit. All I have done here after sticking it down is to perforate all the available holes on the plate.
 This is the first movement of the parchment and plate.  Using the sections you have perforated, turn your parchment and plate so that you have two completed sections slot into place,  and match up.  While feeling it slip into place, take great care to stick it down with the tabs again.  Get right over the top of it to make sure that those holes are matching perfectly.  Then you are ready to carry on from where you got to, to get round that next corner accurately.

I hope you can see here how I have used what I have already done to line up for the next section.  Yo can line up with just one section, but two are better if it is possible.


At this point, I think I am on track with two corners done.  I have to admit that I do not work in the best position as I tend to do this, while listening to the TV with my work on a lap tray.  


Ideally, you should work on a flat table, where you can get your head right above your work, especially when you need to turn and reposition.

This is the final corner where things hould have matched up perfectly.  At one time, if I had got here and realised that I was not 100% accurate , I would have screwed this up and thrown it into the bin and either started again or given up for ever.

However, I am wiser now and I have learned that you can get away with imperfections and thos imperfections are what make your wok personal and unique.  Really bad ones can be helped with the addition of butterflies, dragonflies or flowers.  Even a pretty bow can be used.  By the way, not all of those additions are covering problems, sometimes we add them just because we want to and we can. 

This is the first corner, where I first started doing the perforating.  I have now turned the parchment and plate over so line up the design perfectly, ready to start adding the embossed dots.  Again, you need to be right over the top of your work with a good light, to slot the dots in between the perforations, and then anchor it down.  After sticking it down, check again to make sure your dots are in the right place.  It is amazing how often the parchment will have moved just fractionally.


Once you have done your first corner, putting in all the dots around the perforating, you repeat the steps of turning parchment and plate to line up each section in turn.  If I find that I are slightly out at any time, I find it easier to remove all the tabs, and work one dot at a time, just adjusting that minute amount needed each time  It takes time and patience but it works.  Try it on a corner on a spare piece of parchment and you will see what I mean. 

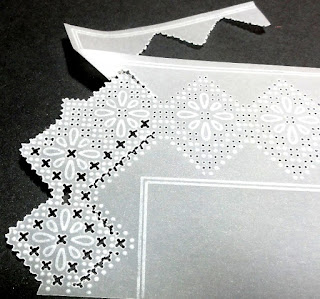
This is the whole thing completed all round, and you should be able to see where I have had to fudge it to make it fit reasonably.    I am not going to stress over it as, by the time the whole piece is done and dusted and the bad bit put at the bottom, it will not be noticeable unless you really peer.


This is the start of my re-perforating and then snipping, the bit I really love.  Remember, just the tips of the scissors into the holes, squeeze till you see the "v" form, and then snip.  That little click as it works is so addictive and pleasing.  Again, lots of practice on spare bits of parchment are key to getting things right.


One very good tip from Josie is very important when you come to the snipping across the line at the top of this picture - when you have slightly wider gaps to snip, do those bits first, and then do the narrower gaps after.  It will give you a much neater result. 


 On this photo you can see the first and last corners, both finished and you should be able to see how I had to adjust the last one.  You may also have noticed that my embossing of the lines for the flowers is rather scratchy and messy to begin with.  That was partially deliberate so that they would not show once I had done the white work, and partially because I forgot to rub the back of the paper with the tumble drier sheet before starting the perforating.


 This is the first corner, now re-perforated and snipped.  Josie Davidson, the talented designer of these plates, does not re-perforate but she is an expert and knows exactly how deep to go.  I am not an expert and find this way suits me.  As long as your holes are clear and good round holes, then you will get good snipping.


 I hope this has helped some of you and not caused too much confusion.  If you have any questions, just put them into comments on this blog and I will try to sort them out in future blogs very soon.  There are one or two other little tips that I would like to add to this, but I reckon this post is a bit of a marathon for you and me as it is.



Saturday 30 March 2019

Saturday is workshop day

Once I got to Whittington, it was a great day of crafting and friendship.  Getting there was slightly fraught.  As it was the first time I had been to this venue, I had set my SatNav to direct me there.  Unfortunately, I was already on the motorway before I realised I had inadvertently turned the sound off - made life a touch tricky.

The rest of the day was great, with two fabulous pieces of gridwork to get our teeth into, designed and set up by Josie Davidson and Chris Walker.  It was so good to see some new people having a go and doing so well.

Lynne Bishop was in her element as she loves gridwork more than anything else, I think.  I took a while to get my brain back off the motorway and in the right condition to count up to four.

Lynne and I both made the decision to do the groundwork for both pieces while we had the plates in front of us.


This was my first one, lots of perforation and embossing to do.  I am ashamed to say that this was my third attempt to get the first row of perforating correct.  As I said, I think my brain was still on the motorway.  However, third time lucky and it matched up all round with only one slight mistake, an embossed dot in the wrong place, but it was easily resolved as it just needed to be perforated instead.  I did emboss the tiny dots within the central section straight away, as I had only done the outlines very faintly.

Number two seemed easier, probably because my head was back in the right place.  The outside border is the same, with a change of plate for the centre.


Both pieces will reappear in my blog next week, I hope, as they gradually get worked on to complete them.  (Yes, Lynne, so far I can remember where I have put my brands and gems).  There is a fair bit of colouring, re-perforating, and snipping to be done before they are finished.  All three of those skills are my favourites.  The only problem with the snipping is that my jumper and the carpet need vacuuming afterwards, but I love the little clicking as the crosses etc separate and fall out.

Apart from the crafting, there was CAKE!!  Huge slices of beautiful cake to celebrate Doreen's birthday.  Happy Birthday, Doreen.  There was also lots of happy chatting and cementing of friendships.

Thank you to Josie and Chris for their hard work and meticulous preparation to get everything ready for us.  Looking forward to the next one in June.  I will double check my SatNav before getting to the motorway.

Friday 29 March 2019

Friday - Finish Off Day

Well, this was supposed to be a day when I showed bits from my UFO box that I had succeeded in finally completing.  

That has not happened yet.  

What has happened was that I went to get my folder with part done parchment pieces, which I had in my hands last week.  Right this minute, I am collapsed in front of the TV recovering from my failure so far, trying to gather the energy to search again.

I suppose I could count today's efforts as being moving towards finishing my major clear out of unused and no longer wanted craft stash.   If you want to see some really good pictures of some proper finishing off, just nip over to Maria Moorhouse where you will see a real gem of several different skills being used to create a lovely card from bits from her UFO box.

OK, rest over, time to get back to the hunt.  I also need to sort my things out for tomorrow's workshop with Josie Davidson and Chris Walker.


Thursday 28 March 2019

Thursday for Techniques and Tips Number 1

Before I start, you need to understand that I am not a design team member, nor do I count myself as any kind of expert.  However, I do have an enquiring mind and I like to understand why some things work and others don't.

I have noticed a few people having problems lining up the two different parts of the beautiful and lacy King and Queen Groovi plates.  So I thought that might be a good start today.  I just happened to have the King plates by my side, and pulled out Edward at random.  I also had got several pieces of parchment cut for the PTC swaps, so, rather than experiment on a large sheet, I chose to use a couple of these 2.5 inch by 3.5 inch pieces to play with.


Number one was done by perforating first, then lining it up to do the embossing.  I wanted to check whether I found that easier than the more traditional way of embossing first, then perforating.   I made sure that the plate and parchment were very well secured to each other with no possibility of moving.   In this case, the perforating was only very shallow, which cuts down the risk of damaging the holes while embossing.  I only used the corner of Josie Davidson's lovely plate to do the lining up.


Once the perforating was done, I flipped the plate and parchment to line the dots up within the framework of the holes.  This time, it was essential to be right above the work to be able to line things up exactly and I needed to reposition a couple of times until it was right.  Like all parchment work, patience and care is essential, and if you don't secure it all properly, the parchment WILL slip.  Keep a close eye on things to keep everything lined up all the way.

Once you have embossed all the dots, remove the parchment from the plate and begin re-perforating but this time deeply with your tool upright.  If you test out on a corner of this test piece, one row of holes with your bold single needle tool held at an angle, then by the side another row but with the tool held upright.  You should see a big difference.  You need good round holes to get good snipping.

My second piece was done with the embossing first, then piercing afterwards.  Again, I made sure that I was right above the paper before firmly fixing it down.  I did find it harder to line it up that way round and the results show it, with the crosses being just slightly out of line, not much but enough to annoy me.  


So, the decision for me was that I was happier with the results I got by perforating first, then embossing afterwards.  For both pieces, it was essential to re-perforate each section before snipping.  Unless you are an expert (in which case, you are able to make your own choice),  I would suggest you do several of these tiny practice pieces until you have fully mastered all the skills involved.  It is a right royal pain to do all this perforating and embossing only to mess up the snipping.  There is really no alternative to practice.  None of us are born experts.  Those experts have been honing their skills over many years.

You may have noticed that the snipping on these pieces could be greatly improved.  That is mainly because these plates require the bold tools, which I rarely use, so I am not used to snipping the wider spaces.  I need to practice that skill.

I suggest that you only re-perforate in sections rather that the whole thing in one go because over a surprisingly short period of time, the parchment relaxes and the holes start to close up.  Try doing a row of holes and leave them overnight. The next day, re-perforate half of them and look at the difference.  Remember good holes make good picot.

Hope this helps.  If you want to know more, just ask, and don't forget that Groovi Worldwide is a brilliant place to contact the experts for their help.

P.S. I have had a couple of requests to take this post further to do a complete piece.  Obviously, this takes a little more time, but I will do my best, aiming to post it on Sunday.  If you do have requests about problems, do tell me in your comments, and I will try to work through them where I can.

Wednesday 27 March 2019

WOYWW 512


This is my desk this week, my lap tray which I can carry through to sit in the sun to make the most of it.  I have a comfy chair in front of the dining room window so that I can watch the birds and keep an eye of Flash while he wanders in and out.

There are three separate pieces of work here at different stages.  The piece on the right is just at the beginning - an old embroidery transfer which I am going to trace, colour and emboss onto parchment.  The one on the left has had two days of work so far and is for class.  The third you can see further down this post.

Why should I be showing this tray, I hear you ask.  Well the answer is in the title of this post.  Almost ten years ago, a lovely lady by the name of Julia set up a small online group by the name of "What's On My Workdesk Wednesday", which is still going today.  We each take a photo of our workdesk, warts and all  and link the resulting post to Julia's Stamping Ground blog.  Then we all go round and have a look at what everyone else is doing.

 It has been a busy couple of weeks, both crafting and non crafting.  I am gradually getting together a whole load of crafting kit that just is not getting used, both media and stamps, plus a lot of dies.  

Some of it will go to Derbyshire for a decision to be made whether it stays there for my granddaughters or to be passed on to the craft group in their school.

Some of it will go to the crop in June to sell off in aid of the charity.

Some will go to a local craft group for disabled people.

I have already ditched the total rubbish, so what is left is in good condition, partly because I don't use it.  Due to lack of space, I am getting rid of almost everything that does not come from my favourite company (no prizes for guessing the name).


In between this clearing out, I am busy doing my favourite parchment craft.  That includes recovering from disaster a tiny piece, a PTC (parchment trading card), which I had seriously over embossed, resulting in ugly and lumpy parchment.  With the encouragement and help of my tutor, it has gradually settled down and smoothed out.  That just confirms that you can rescue most pieces of apparent disaster, and learn more from them.

As crafters, we are all guilty of over criticising our own work, and too much of it ends up in the bin.  That is where this piece might have gone without help from my tutor, who showed me how to gradually bring it back from the brink to something I am quite happy with.

While you are wondering what pieces you could save from the bin, Julia  has got the coffee on for you at Stamping Ground while you wander round to see what everyone else is doing.  Have fun.

Tuesday 26 March 2019

My blog week, day by day

Now I am getting myself sorted again with this little blog, I need a plan to keep me going.  Barbara Gray has a day to day plan, even if she varies it to suit sometimes.  Maria Moorhouse also has a plan for her day to day posting.  I am not sure how either of these ladies find the time to fit in their blogs.

So, here we go, trying to make a plan.
Monday for Mindfulness - or it could be to relax and recover from a busy weekend?
Tuesday Tidy Up - that could be to tidy up craft stuff or tidy up the house?
Wednesday What's On Your Workdesk Wednesday -  desk needs to be tidy to take the usual photo for that day.
Thursday - still to be decided, so if any one has any ideas, please post a comment at the bottom of this post.
Friday Finish Off Day - that was a good idea stolen from Maria.
Saturday Start Something New - it is often a day for a workshop where I learn new skills
Sunday Sleep In - as long as there is no workshop that day too.

That is as far as I have got today.  Any ideas gratefully received.  I am not the most organised of people and easily distracted by seeing craft stuff I had forgotten, so Tuesday Tidy Up could cause serious distraction.  I have a butterfly mind at the best of times.

P.S. Thank you to everyone who is taking the trouble to give me ideas.  I will take them on board and use them when my brain is back in gear this morning.

Monday 25 March 2019

Barbara's Favourite Flowers - My Take On Freesias from 2018


I have known for a long time that Barbara Gray's favourite flowers are freesias, and they are a favourite of mine too.  I love their perfume.  In November 2017, at the NEC I showed Barbara pictures of wedding flowers and decorations that my daughter, Rebecca, had created out of paper for her friend's wedding.  I had no idea before that just what this bit of innocent "showing off" would lead to, which was an invitation for Rebecca to create the wedding flowers for Barbara and Dave's forthcoming wedding in the following June.

If you watch Barbara on TV, you will almost certainly have seen pictures of her bouquet.  You may not have realised that it contained beautiful hand made paper freesias.  I am not going to show those on here as that is for Rebecca to show her secrets.  However, her work did prompt me to do something with this month's Stamp of the Month, the freesia, but in its Groovi form.

So, my choice was to create pillow boxes from parchment.  On one side I traced the Groovi freesias, putting one single flower on the flap.  I found a die to cut the shapes, and was able to cut three at a time, which helped a lot.  I used just three Faber Castell watercolour pencils to colour and shade the flowers and leaves, choosing a colour for the flowers to tone in with the wedding flowers.  Those three pencils are now very short as I needed very sharp points to colour within the design.  There was also a little embossing to add highlights, mostly done with the smallest shader.


The other side changed part way through.  I wanted to use Barbara's favourite verse, the Serenity Prayer.  I was sure it had been a stamp, but did not possess it and it was not in the current catalogue, so resigned myself to the more lengthy job of using the Groovi, until I mentioned it to Paul.  He managed to find me the stamp, which I then used very gratefully to stamp with Versamark and a soft lilac embossing powder.


The final touch was to use Linda Williams' bumble bee Groovi plate to add on the flap.  I have to admit that colouring in over eighty bumble bees, and then perforating with the two needle fine Pergamano tool and snipping them out was an interesting exercise, but they are rather cute.  They were also essential for this purpose as the boxes contained wild flower seeds, intended to attract bees and butterflies.


I had the very stressful job of taking all of these and the much more important job of carrying the official flowers all the way from Worcestershire to Kent safely.  I never knew there were so many nasty bumps in the road and I cringed at every one.  However, they all arrived safely.


Rebecca is now busy on another set of wedding flowers with another wedding to do after that.


Sunday 24 March 2019

Mishaps, Part Two

Yesterday, I posted pictures of two PTCs that were less than acceptable and were full of mistakes.  Today I took them both to my parchment class with Patricia White to show her how bad they were.  Towards the end of the class, she took the embossed one, with the number 3 tool, and just, very gently, stroked the embossing in a couple of sections.  The difference was huge and is a very good example of why you should not give up on a piece of work.


For those who did not read the original post about this tiny piece of parchment, I was cross with myself for being in too much of a hurry and just being too impatient.  This resulted in ugly, lumpy embossing.

I truly thought that this was one piece of parchment that was heading for the bin.  However, Pat worked on the top left sections, and I think it is clear to see the improvement there already.  She thinks that, with time and patience, it will improve a lot more.

I think I will just work it very softly over the next few days, leaving it to rest every night.  I will keep to the number 3 tool to smooth it out as much as possible.

My original idea when posting these on Saturday was to give encouragement to those who are struggling and show that people who have been parching for a long time do get it wrong.  However, after today, it is turning into showing that even apparent problems can be turned round with a little help and a lot of patience.

Don't discard what you think is a disaster.  Set it aside for a while, with a note to say what you did and why you think it has not been successful.  Then, when you can discuss it with someone with much more experience.  You will, almost certainly, be able to rescue some if not all.

One thing that Pat reminded us of this morning that often what we see as accidents and problems can and have led to new discoveries.  Your "disaster" just might lead to a new technique.

Saturday 23 March 2019

Mishaps with perforation and snipping your parchment

Since Josie Davidson started the Parchment Trading Cards and Coins monthly challenge, I have been using it to build up a collection for future use.  Once I have done the one needed for the month, I do several more, roughly based on the monthly theme.

So far, I have only managed two extras this month, but I decided to show them.  Neither are perfect and have bad faults, but we learn from our mistakes and they are only tiny pieces anyway.


This one looks ok in this poor photo, but in real life, it is a very different matter.  It started right and the snipping is not too bad.  I perforated very shallowly to begin with because I needed to emboss between.  That is where it went wrong.  The embossing is very rough, and that is because I was too impatient and did not leave enough time for the parchment to relax.  Someone who doesn't know much about parching would probably like it, but it is not right and it leaves me slightly frustrated with myself.  I know better than to rush.

The picots are not too bad, because I did take the time to re-perforate each section before snipping.  That makes such a difference.

This is my second piece, also with annoying faults, which I could have avoided with a bit more planning.


This time I started well, working from the outside with circuits of each shape, again shallow perforating.  You can probably work out where my maths went a bit awry and the circuits became messy.   I added smallish dots in various places, but the messed up but would have been better left alone.  Again, I re-perforated each row before snipping one section at a time.

Next time,I will try working it out properly on grid paper first instead of winging it.  I think I might be adding a couple or three of Tina's small flowers to cover the worst.  

You might be wondering why I am blogging about two poor pieces of work.  Well, my reason is to show that we, none of us, get it right all the time, and learn from our mistakes.  Don't be put off, no matter what hobby you undertake.  None of us are born as Olympic gold medallists.  We all have to learn to walk before we can run.  So in our hobbies, we need to learn and practice the basics before progressing to the advanced stuff.  Enjoy the process of learning, not just the end results.

Have fun.  Life is too short to stress over a tiny piece of paper.

If you enjoyed reading this, I would love you to leave a comment here.

Friday 22 March 2019

NEC Postscript

I did intend to show these photos yesterday with the rest of the NEC shots, but decided against it s that post was already a marathon.  Not too many here, just a few of Linda Williams running one of the free Groovi Make and Take sessions for Clarity.  They were very popular, as always, and fully booked very early each day.


It was good to see so many new people trying the craft for the first time, some looking very doubtful to begin with.


From what I saw, everyone really enjoyed themselves, and several went off to the stand afterwards to set themselves up with the Starter Kit, the best way to go to begin with.

No more NEC photos to come.  Promise!


There was one person on the Clarity stand that I completely forgot to take pictures of and that is the lovely Lou Withers.  I think I was too busy talking to her and watching her build up the layers on her work, mainly using the Viva Decor paints and pastes.  Really fascinating.  Thanks for all your tips, Lou.

Thursday 21 March 2019

NEC in Pictures

I normally do two days at the NEC craft shows.  This time I had intended to do all four to allow time to do more workshops,   That did not quite work as the big art section I was expecting was not there - boo, hiss!  However, I did do three of the four days and thoroughly enjoyed myself, meeting up with old friends and making new ones, and took lots of photos of anything to do with the Clarity stand, which was HUGE, and several of what was happening on the Hochanda stage.

WARNING - this post is very photo heavy.  You may not want to read all I have written but you can get the idea from just scanning the pics.

Thursday
The first group are of the enormous Clarity stand.  One of the questions in the first of the Clarity shows on Hochanda was "how long was the stand".  If you want to know that answer, just watch Barbara's show on the Thursday.  Let's put it this way, it was a long way from Barbara at one end to Paul at the other.

 Here is Paul, doing his stuff, answering questions, showing just how good the Groovi system is, and encouraging new people to have a go.  Paul may not have mastered all the advanced techniques yet, but he is the ideal person to encourage people to believe they can succeed.

 As you can see from the next few shots, the stand was long.  The other thing that struck me was that the NEC seems to have listened to us as customers, and the aisles are a bit wider.  Even on a busy day, I was able to turn my buggy relatively easily wherever I wanted, which is a welcome novelty.  Now, we just need them to realise that numbers attending these shows will continue to drop off, due to the cost of the car parks.

 Last November, they hiked the cost for the day from £12 to £16.  Yes, if you knew about it and remembered to do it, you could keep it at £12 by booking online the night before.  However, there were already a lot of people I know who had decided not to go to the show and buy their goodies online.

Dropping the price of parking would bring a much greater footfall, better for the exhibitors and the concessions too, the food outlets etc.

Dropping the extortionate cost to the exhibitors would bring back a lot of the smaller stands too, the ones who have gradually disappeared over the years.

A nice shot of Hazel Edwards, filling in for Barbara while she was up at the Hochanda stand.


Taking photos of the stage at Hochanda is always tricky as, of course, there are several cameras required to capture the action, but I did get the odd one or two.  This first group is from the Thursday.

 What a lovely lady Leonie Pujol is.  Bright and bubbly, but totally professional.  A great addition to the Clarity design team.
 Didn't that outfit suit Barb, such a beautiful colour.

 It was hard to grab a clear shot, without all the cameras ding their job.


The standard of the camerawork was brilliant, especially with the crisp, steady, close up shots.
T
 
 As always, Barbara and Leonie make such a good team, fun, chatty, but both very professional and dedicated to their job.


This couple came out of the audience because they had  written and performed, on Facebook, a song supporting Hochanda.  It is out there ify ou want to watch and listen to it.


 This final shot from Thursday is of John, who kept us all well supplied with lollies, cola bottles and jelly babies.


Friday

These are all from Linda Williams' show with the new/old perforating tools.


 You might just be able to pick out the lovely
 Glynis Whitehead with her back to us sitting in the centre.


This is very much the view the live audience gets most of the time, but it is interesting to see how they put the programmes together.  However, there are two large monitors for us to see the close up work.


Linda was worried about how she could make the business of making holes in parchment look interesting, while she was demoing the new set of tools. 


She need not have worried, as the audience was enthralled.


 Sunday

 Not so many pics from the final day on Sunday, just a few of Paul's show with the Fresh Cut dies.


Here is Leonie, warming up the audience.


The final two shots, with Paul doing his stuff with the dies.


I hope you have enjoyed this little trip with me and have not gone to sleep on the way.  If you did go to sleep, I hope you had a good snooze to gather your energies to get stuck into some crafting of your own.