Before I start, you need to understand that I am not a design team member, nor do I count myself as any kind of expert. However, I do have an enquiring mind and I like to understand why some things work and others don't.
I have noticed a few people having problems lining up the two different parts of the beautiful and lacy King and Queen Groovi plates. So I thought that might be a good start today. I just happened to have the King plates by my side, and pulled out Edward at random. I also had got several pieces of parchment cut for the PTC swaps, so, rather than experiment on a large sheet, I chose to use a couple of these 2.5 inch by 3.5 inch pieces to play with.

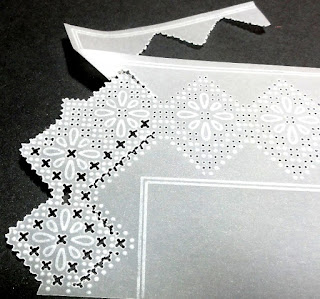
Number one was done by perforating first, then lining it up to do the embossing. I wanted to check whether I found that easier than the more traditional way of embossing first, then perforating. I made sure that the plate and parchment were very well secured to each other with no possibility of moving. In this case, the perforating was only very shallow, which cuts down the risk of damaging the holes while embossing. I only used the corner of Josie Davidson's lovely plate to do the lining up.
Once the perforating was done, I flipped the plate and parchment to line the dots up within the framework of the holes. This time, it was essential to be right above the work to be able to line things up exactly and I needed to reposition a couple of times until it was right. Like all parchment work, patience and care is essential, and if you don't secure it all properly, the parchment WILL slip. Keep a close eye on things to keep everything lined up all the way.
Once you have embossed all the dots, remove the parchment from the plate and begin re-perforating but this time deeply with your tool upright. If you test out on a corner of this test piece, one row of holes with your bold single needle tool held at an angle, then by the side another row but with the tool held upright. You should see a big difference. You need good round holes to get good snipping.
My second piece was done with the embossing first, then piercing afterwards. Again, I made sure that I was right above the paper before firmly fixing it down. I did find it harder to line it up that way round and the results show it, with the crosses being just slightly out of line, not much but enough to annoy me.


So, the decision for me was that I was happier with the results I got by perforating first, then embossing afterwards. For both pieces, it was essential to re-perforate each section before snipping. Unless you are an expert (in which case, you are able to make your own choice), I would suggest you do several of these tiny practice pieces until you have fully mastered all the skills involved. It is a right royal pain to do all this perforating and embossing only to mess up the snipping. There is really no alternative to practice. None of us are born experts. Those experts have been honing their skills over many years.
You may have noticed that the snipping on these pieces could be greatly improved. That is mainly because these plates require the bold tools, which I rarely use, so I am not used to snipping the wider spaces. I need to practice that skill.
I suggest that you only re-perforate in sections rather that the whole thing in one go because over a surprisingly short period of time, the parchment relaxes and the holes start to close up. Try doing a row of holes and leave them overnight. The next day, re-perforate half of them and look at the difference. Remember good holes make good picot.
Hope this helps. If you want to know more, just ask, and don't forget that Groovi Worldwide is a brilliant place to contact the experts for their help.
P.S. I have had a couple of requests to take this post further to do a complete piece. Obviously, this takes a little more time, but I will do my best, aiming to post it on Sunday. If you do have requests about problems, do tell me in your comments, and I will try to work through them where I can.
15 comments:
Morning Maggie, can't you sleep either?
Thank you for taking the time and trouble to explain this. I have found I get a better result by shallow perforating first, at least the outline.
Love, Roz.xxx
This is brilliant Maggie and will provide a great deal of help to many people. Xxx
Thank you Maggie. This will be a great help. I have not tried perforating first yet but will try it later today at Bromsgrove. I am just off to make a cup of tea and then I will sort out what I am bringing. I do have an ever growing pile of UFOs ( unfinished objects ) to complete. See you later.XXX
Thank you Maggie. This is extremely helpful. I’ve got the Victoria plate and have only used it once because I found it so difficult (I embossed first). I also got rsi because I did lots of embossing and perforating in one go. Won’t do that again!
Thanks Maggie, that was most useful. I am still very new to this but determined to be able to achieve some of the beautiful results that I see. I think you are right it’s practice practice practice, but having tips from someone very experienced is very helpful.
Chris x
My preference is to perforate first. Good explanation Maggie. X
Good morning Maggie. Thank you for sharing your thoughts with us all. You're a very wise woman! And yes you do have a very enquiring mind which is good.
I find it easier to perforate first as when you turn the parchment the holes slot into place so you can carry on perforating. It's also easier to adjust the embossing if you need to.
I have some secret stuff to do today so I'm up and at it early so I can also watch Hochanda as I craft. There are some good shows on today.
Have a great day. Hugs xxx
Thank you Maggie for writing such a detailed post, I shall find this very useful to follow. Kathy x
Morning Maggie, this is the first time I had seen your blog and was delighted with it, i too had trouble lining up the plates, but yesterday I tried to perforate first and I found it was easier, however, I must have been too eager because I used the bold tools, I will try your method and see how it comes out, I really love the lace plates and would be overjoyed to master at least one of the techniques. Are you going to the April Groovi retreat, if so, see you there.
Stay safe, healthy and happy, hugs, June Smith xxx
Thank you l did the pricking first which helped me very much xxx
Thank you Maggie, it is very kind of you to spend your time figuring this out and then explaining it to us, I am sure I speak for all of us who read this in saying that we are very grateful x
Well researched. Ann from Bromsgrove parchers.
Thank you Maggie, for this explanation. I would totally agree with you that everything needs to be well secured, even the plate within the plate mate. Xx
Hi Margaret
Thank you for taking the time to work and explain the different ways of working the king and queen plates. I have the blue 1 and 2 perforating tools. But I don’t know which sizes ihave. So if I’m able to come to Evesham I’ll bring them with me to see if anyone knows if they are fine or bold.
Thanks for the tips on how to line up these new style plates. I tried it & I think I cracked it. My name has now popped up in the comment as box on my phone app so hopefully you will know it’s me !! Sue x
Post a Comment