Make your own theme does not mean that anything goes. The basic rules for the challenge still apply. If you want to be certain that your design fits the brief, then follow this link to check http://craftascene.blogspot.co.uk/p/challenge-rules.html There is one further rule this month. When you make your own theme you need to
tell us what theme you have chosen. Only those who include an
explanation of their chosen theme will be included in the Top 3 picks.
Many of you will be aware that I have been missing from my Design Team duties for a while, but I reckon I am back on course now, and so pumped up by a great day of watching the wonderful Barbara Gray demoing on Create and Craft TV, and chatting online with like minded crafters on the Clarity Stamp Facebook site at https://www.facebook.com/claritystamp.co.uk
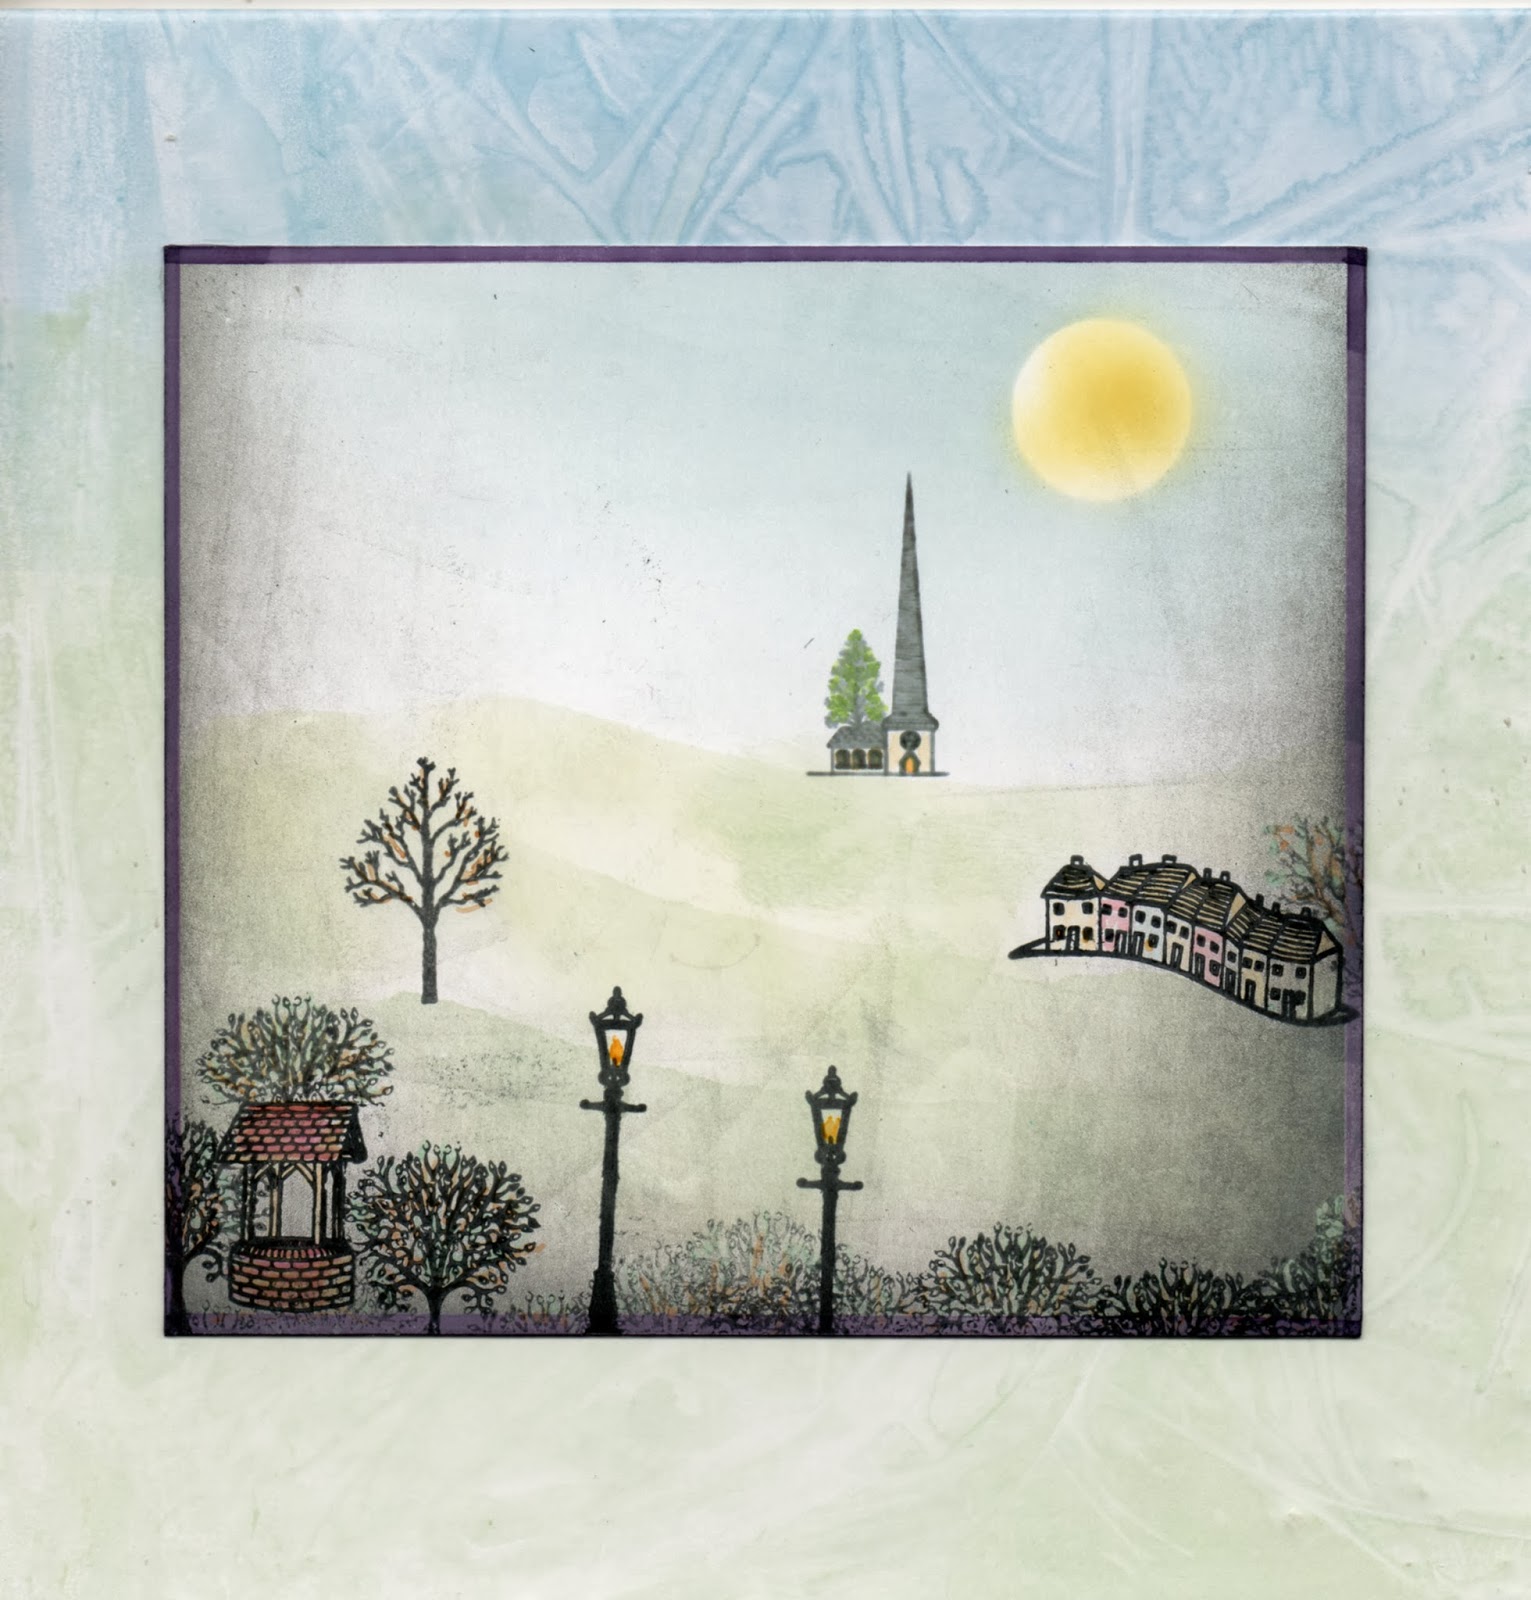 This first card reflects that increase in mojo, and uses the Clarity Stamps small Village set. I chose the Clarity coated card, which is perfect for brayering, and stamped the various bits into place. Then I cut masks for the houses, wishing well and lampposts from the sticky end of a Post-It-Note and put them into place. Another mask was needed for the sun, just a circle cut from the sticky end of the Post-It-Note again.
The brayering of the sky was done with Adirondack Cloudy Blue. If you want to see a good tutorial on brayering, download the Create and Craft App and watch yesterday's programmes with Clarity Stamps. Load the brayer in the centre with your chosen ink and then transfer it to the SplodgeAway mat, making sure the leading edge of the brayer remains clean and ink free. Then you come in from one corner, starting off the paper and finishing each roll off the other side of the paper and lift the brayer at the end of each movement. Gradually come down the paper in repeat rolling until you achieve your desired level of colour. That way, you should avoid the dreaded lines across your scene. If you don't have a brayer, get a good make up brush or a stencil brush and use that to apply the ink, again coming in from one corner and gradually increasing the amount of ink applied. Remember to do it gradually, you can always add but you cannot take it away.
The ground was done with a piece of torn copy paper, holding the paper in place to create the hills and applying ink gently with a make up sponge working off the torn paper, then moving the paper to do the next hill. You need to place the hills carefully so that you can "ground" any trees or buildings, so that they are not floating in mid air.
To colour the sun, I used the hole left by punching out the sun mask and coloured through that, trying to add shape by shading it.
To create the misty effect, I added a little black Adirondack around the edges. You can use the brayer or brush for that. Then it is just a case of removing the masks and colouring the various bits of stamping, the houses, church, wishing well, and the lamps. I used Promarkers for this, which work well with the dye based ink pads without smudging.
Once the inks are dry, you can use a piece of kitchen roll to polish the surface of the card to a high gloss.
The backing paper was created at the same time as doing the brayering. I used Clarity coated paper, and applied splodges of ink fairly randomly. Then you need a piece of cling film, spray it lightly with water and apply it to your brayered paper, scrunch it a little and then leave in place until it is thoroughly dry. Remove the cling film, trim the paper to the desired size and use it as a wrap for your card, and position your topper in place - a perfect match as you have used the same colours.

I like to match my inserts wherever possible. This is a mixture of computer work and brayering. I printed the sentiments, and then gave that time to dry thoroughly before getting the brayer out again, and working in the same way as for the main topper.
I hope that this explanation will convince you to have a go and produce your own themed card for this month's challenge for Craft A Scene There are other ideas on the blog from the other members of the Design Team to give you inspiration. You do not need a lot of stamps to create a scene. You can do it with just one small stamp, some cheap copy paper, a brayer or make up brush and a make up sponge, a couple of ink pads. See what you can do and I look forward to seeing what you come up with.
Have fun with your experimenting.
4 comments:
Hello Maggie, a fabulous scene you have created, I love it! Thank you for the instructions and it is lovely to see you showcasing your work again.
Hugs
Linda xxx
Maggie, this is just beautiful. Lovely background paper with your plastic wrap technique! Hugs
Ah Maggie just beatiful second post with lamp stamps... today...previuos one was on gelli plate witj pallette knife to apply acrylic paint and make scene... cant remember whose blog... but great idea too
Shaz in Oz.x
Maggie, I love how you can whip out a hilly scene so easily with just torn paper and ink. Looks fabulous. NancyD
Post a Comment