Welcome to my blog

I hope you enjoy reading my posts, and please leave me a comment. I always enjoy reading them, and will try to visit you in return.

For security reasons for me and for you, I would appreciate it if you would leave your name on your comments.

You are welcome to copy any of my designs, as long as you do not take credit for them yourself. I am very happy for you to sell them. If I have used anyone else's design, I always try to give credit where it is due. If I have missed anything, please let me know and I will put things right.


This is intended to be mainly about my crafting stories, as a personal record of what I do. However, I interpret crafting quite widely, not just paper crafting but other things too. I have a butterfly mind and like to change from one thing to another depending on what I feel like on a given day - knitting, crochet, cross-stitch, cards, baking and several others, including my favourite right now, parchment, both traditional skills and Groovi, very relaxing and calming to do.

I have decided to put some structure into my blog so that each day will have something of a theme.
Monday- for Mindfulness; Tuesday - Tidy Up Day; Wednesday - What's on Your Workdesk Wednesday; Thursday - Technique and Tips; Friday - Finish Off Day; Saturday - Start Something New; Sunday - Anything Goes
These themes are not hard and fast and will be changed if I feel the need.

Sunday, 31 January 2016

Clarity Stamp challenges for January - "Say it with flowers" and Barbara's Calendar Challenge - "A New Day is Dawning"


The main Clarity Challenge for January is "Say it with Flowers".  This is a design I have played with before but it is always such a fresh design with loads of white space.  For those who want to know, it is a one layer card.  

The first thing is to lay two pieces of masking tape across the card, and make sure you can keep the top and bottom completely protected from any ink.  Then ink up your chosen design and stamp it randomly between the two pieces of tape.  

Remove the tape and use a thin black pen to draw lines to enclose your design, either with a ruler or freehand, whichever is easier for you.  Then colour in the flowers with coloured pencils.

The sentiment is overstamped, first in black and then slightly offset in colour to give a shadow.

******************

The second challenge is one from Barbara herself, to recreate this month's picture from her calendar.  January's design is a reflection technique, using the Gelli Plate to stamp the reflection itself.  Rather than go into how to achieve it, I would rather refer you to Barbara's own instructions on the calendar, or her YouTube videos.

I was short of one stamp, as you might see, the birds in flight, so I drew those in with a dark pencil crayon.  When I trimmed the large piece down I turned the offcut into a potential tag, drawing the birds in again.  After brushing brown and grey ink around the edges to make a vignette, I liked the effect of mounting it direct on the base card, rather than hunting for another piece of card to fit. 

 
I do not like throwing card away so this seemed a good use of this small piece.


Wednesday, 20 January 2016

What's On Your Workdesk Wednesday 346

This is only my second blog this year, which is dreadful, and I am very late today.  For those who do not know what WOYWW is all about, I shall refer you to our esteemed leader, Julia, at her Stamping Ground blog.  As I am working on my Kindle tonight, I cannot add the link, but it is easy to find on Google.

My table today is all about a new challenge using the Groovi Plate Starter Kit, which I will talk about more when I have finished my entry.

You may also see the remains of my teatime smoother, which contained a banana, an apple, a large pear, cucumber, ginger, basil and carrot.  This is all part of my 28 days of juicing.  I have lost over 10lb in just over a week, so that is a good start, and I have gone right off things like chocolate and cake etc.

At the back you might also notice a part completed card.  It is holding flakes through a tree stencil onto double sided adhesive sheets.  Beautifully sparkly and very easy and quick to do.

I will leave it here and hope to visit as many of our other dealers as this week progresses.  Have a healthy and happy week.

Friday, 1 January 2016

Happy New Year - my first completed card of 2016

After watching Barbara Gray working with double sided adhesive sheets, gliding flakes and stencils, I found a few minutes to play.  This is the result, using the tree stencil from Clarity.

Ingredients:
Clarity stencil
Sheet of double sided adhesive
Gliding flakes -Pirate Treasure and Gold
Clarity stencil/Gelli card
Brown card for mounting


Place a piece of double sided adhesive sheet on the stencil card and smooth down firmly.  Remove the second piece of waxed paper from the adhesive and position your stencil as you wish.  Add gliding flakes and smooth them into all the sticky sections.  I used a mixture of the two colours to try to get some kind of sharing in the landscape.


Use the sanding block to remove all the excess gliding flakes and put them back into a tub for future use.  Then carefully remove the stencil slowly to avoid damage to the stencil.  Brush baby powder into all the sticky areas left from under the stencil.  Give the whole thing another good rub done to burnish it.

It looks good then but you can add more definition and depth if you highlight parts with a coloured pencil.  I used a dark grey and added shade on one side only of each tree and branch.  With this lovely treescape stencil, it is necessary to work out which branch belongs to which tree and highlight to show that.

I also added marks down the trunks and along the branches to give more depth.  It worked well as I found that the pencil on top of the baby powder naturally gave me the slightly scratchy marks I really wanted.

When it came to mounting it, I found that the dark brown worked better than black, giving a warmer feel and blending better with the building flakes.

If you try this technique, choose your stencil carefully,  I found the more open stencil of the treescape easier to remove than those with a wider framework.  The other major point to remember is to remove all droughts and don't sneeze or breathe on the gliding flakes.

Have a Happy New Year, all of you, and I look forward to seeing what you all get up to in 2016.

Thursday, 17 December 2015

ClarityStamp Challenge for December 2015 - No 34

Why don't I listen to Barbara shouting at me?  Why do I go just that little bit too far and then wreck it?

I had started off yesterday with the stencil of the dreamcatcher and transferred that to the parchment, and done all the embossing on that.  All I had to do yesterday was to put the faces from the mother and child into the central aperture.  Easy peasy, no problem at all!

No, there was no problem here, just a little more whitework to do on that central  section.  A little patience and care to avoid puncturing the parchment.

There was no problem even after I had cut out between the lines of the dreamcatcher.  A bit fiddly, but a pleasant relaxing thing to do in front of the TV.  Almost there.


I added a few little star centres off one of the snowflake plates.  Then I decided it needed a little more work so I got out the diagonal pricking plate and set to work.  Still ok at this point.  Then I thought I would be clever and do a bit more cut out work in a pattern.  I really should have listened to Barbara at that point.  She really was shouting at me by then.

Now it went wrong - BIGTIME!!!!!!


Now what to do.  Do I throw it all in the bin and start from scratch or just give up?  If you know me, you will already know that I do not like being beaten, so a bit of thought and out came my scissors, ordinary and parchment.    I cut out the whole of the dreamcatcher with its feathers and the four little stars.  I also snipped out the thin frame  found a piece of pale blue shiny paper, cut a piece of blank parchment to match it.   The parchment was laid over the blue and glued together, with the frame over the top.  Because the frame was embossed and coloured, the glue was hidden.

The final part was to glue the pieces on to the parchment within the frame and stick the whole thing under a weight to keep them in place until the glue was dry.  Here is the final result which is my entry into the ClarityStamp Challenge for this month. 
My choice of the stencil and the Groovi plate was dictated by something I used to read to the chldren in my classes years ago, which they loved.  It was the story of the Creation, told by one of the native American tribes.  Hence the dreamcatcher.  I just combined it with the Madonna and Child, which brings back memories from travelling with my parents in Italy, where we saw the Pieta in St Peter's in Rome.  It was a combination of different beliefs and just seemed to fit the times we are living in these days.

I hope you understand my thinking and like the result.

Wednesday, 25 November 2015

WOYWW 338

My desk this week is alternating between things I am doing, but cannot show, and all the things I bought at the NEC.   Why am I showing you these?  Well, it is all in the title of this post.  It is What's On Your Workdesk Wednesday, when we all join with the lovely Julia to show what we are doing.

Rather late as the show was the beginning of the month, but this is what I gathered from the NEC.   I suspect no-one will be very surprised to see that  pretty well all my goodies came from the Clarity stand.  There are a couple of other things but I cannot show them now as they are for presents.  I also stocked up on base cards which were good value.

They are all out on my table ready to find their permanent homes.


They are all sitting on my newest acquisition, the Best Ever Craft Mat from Ken Oliver.  I love it as things do not slide  on it and it stays put on the table.


I love this little set of stamps, perfect for simple clean type cards.
 

My collection of these chalk paints is growing and I shall soon need another storage box for them. 

 The re-inkers were on special offer with a free stencil as well, so it would have been rude to miss out, now wouldn't it?

My choice of stencil was down to the fact that my star stencil had been so badly chewed by a thieving little dog.  Surprisingly, I have just got that one out from under the heavy weights on top and it is back to being usable

This was what it looked like a few weeks ago, and now it is flat and ready for use.  So while I can see it still in one piece, I will leave you in Julia's capable hands and go and get inky with it right now.  Have a good week, everyone.


Wednesday, 28 October 2015

WOYWW - 334

Well, it is still Wednesday - just!  I had good resolutions to post early today, but I overslept and then got involved in watching Hochanda with Barbara Gray demoing the Groovi system.  In between, you can see the other project I have on the go at the moment.  

Definitely not as clean as the parchment but it has to be done.  These are fabulous mdf lanterns produced by Roy at Candy Box Crafts, and are intended as presents for Christmas.  I am still in the process of applying black Gesso to all parts before decorating.  I cannot do it all in one go as I am getting very black.  I also need to do the whole of the inside before attaching the tops to the main sections.

The second shot does show that I have been painting today.  Once that is all done, then I need to work out how best to decorate it, all ready to take the battery candles.

It has been a long time since I blogged.  Wednesdays seem to vanish so fast this year and I cannot believe we are so close to that word beginning with C.  I have also had quite a large number of projects that had to be completed in a rush.

I hope to get round as many of you as possible this week.  Thank you to Julia for being our friendly hostess for so many weeks.

Tuesday, 18 August 2015

Clarity Stamp Challenge 30 - Bingo!

When I first saw this challenge, my reaction was "what on earth"!  Then after reading the rules, I knew what I was aiming at and roughly what I was going to do.  All I had to decide was which line I was going to use.  My choice was straight across the centre - Stencil, Stamp, and Grunge Paste.


I chose to use the new stencil created for the Retreats this year, the Wee Fairies as my stamps, and Grunge Paste.  However, I wanted to add a twist of trying to get all this onto parchment.  This is the result.


I started with just a simple piece of parchment and drew the stencil through it to place the image in the right place.  The Wee Fairies were stamped onto old tracing paper and then flipped over so that I could trace them through on to the parchment, just where I wanted them.  I added a third sunflower to try for a bit of perspective.  I did most of the embossing before I pushed the Grunge Paste through the stencil.  I would have liked the paste to have been a little smoother, but then I got over that bit as it was "Grunge" after all.  The three sunflowers were painted with Fresco chalk paints, and the gaps in the stems were embossed on the parchment.
 

 The fairies took a long time to emboss on the parchment because I needed them to be as white as I could get them, and that can only be done by doing a little at a time and letting it rest before repeating the process.  I wanted them to look as ghostly and ethereal as I could get, so I spent about two weeks, just going back each day and doing a bit more until I got to the point where I felt that the parchment would give way if I pushed it any further.   You might also notice one or two elements from one of the Groovi plates.


I drew the hills in freehand and then coloured from the back using pastels.  Trying to keep the colour off the fairies was quite hard and also the shading of the sun/moon (your choice).

Attaching the final piece to the canvas board was complicated and involved some glue, all behind the Grunge Paste  but I also used the photo corner punch and mounted it on dark brown card.  I chose Smurf Fresco paint to colour the canvas board and attached everything with super sticky red tape.

I actually finished this a week ago, but was deliberating whether to add more paint as it looked a bit rough, but then I got over that too and left it grungy.  This is probably as grungy as I am comfortable with so I hope it all fits with the brief.  I had fun doing it anyway.

Sunday, 16 August 2015

Lovely Inky Painty day

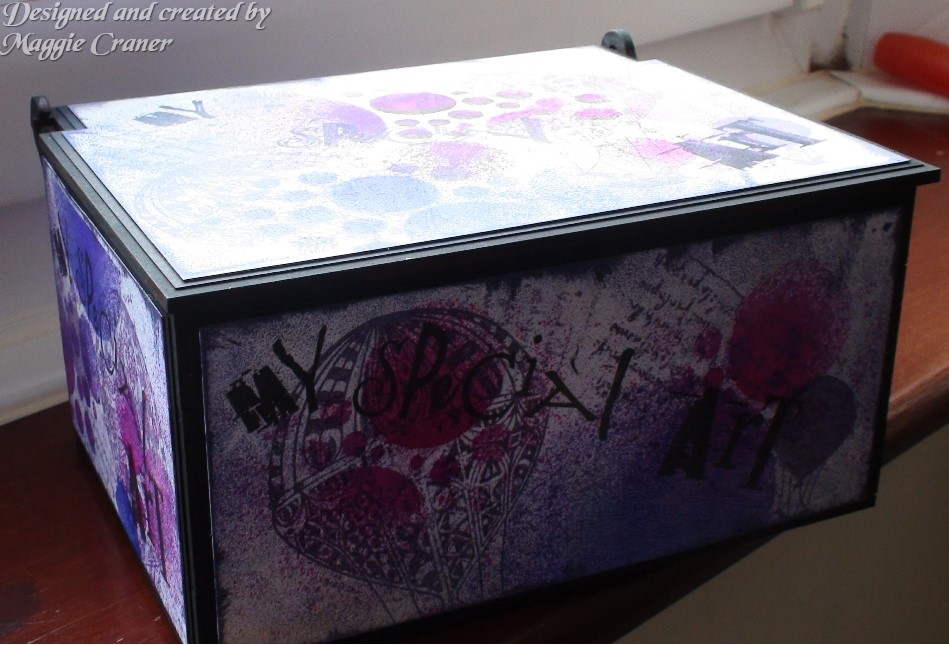
This is the results of my efforts at Pink Tulip Creations Ltd​ at Studley yesterday.  It was good to meet up with Hazel Edwards​ and Christine Birch for the first time, so thank you for your company ladies.  Roy from Candy Box Crafts Ltd​ was our leader for the day, teaching us how to assemble the box to begin with.  That was a real achievement for me as I am not good with 3D crafting, but it worked this time and is still in one piece, something of a record for me.
While the glue was setting and the black paint was drying, Roy took us on to the next step, teaching us techniques for decorating the box, by making a card in the same way, using lovely inky painty goodies - Fresco paints, Dylusion Sprays, Gesso and spritzers and stencils of our choice.  You might be able to see the latest Claritystamp​ club stencil in the background on the card together with a Clarity butterfly and the Visible Image butterfly.  This card is definitely not my usual style but I love the techniques and the resulting card is growing on me. 


Roy had very kindly cut all the panels we needed for the box, which definitely reduced my stress levels.  Although I used most of the same techniques on the box panels, I did change the first stage.  Instead of putting the Fresco through a stencil, I actually excavated my brayer and walked the brayer across each piece.  Because my brayer has not been cleaned through several sessions, it now has a lovely texture on it and it really worked so well - well, I thought it did anyway.


Then I sprayed the Dylusions through my Clarity Jo's Bubbles stencil.  I used just two colours this time, purple and pink.  This is where the texture of the Fresco paints really worked will, resisting the inks perfectly
 

Then we used our own choice of stamps.  I used the words from the Clarity Journalling set in Dusty Concord, before adding some of the Word Chains in Versafine to finish off.
 

If you want to see the array of different creations from everyone yesterday, just go to Pink Tulip on Facebook.  Every one was different, just as they should be.  I do want to seal the surface now to protect it and make it easier to dust, and then I shall have to make another one, I think.

However, in the meantime, my craft area is an ink free zone as I am desperately trying to finish off a parchment piece, which is largely whitework and I definitely would cry if I got any ink on that.  More of that piece on a later blog, once it is finished and delivered.

Thanks again to all the ladies at Pink Tulip Creations Ltd for organising the day and for the cups of tea etc, and to Roy of Candy Box Crafts Ltd for his teaching and his beautifully created boxes.  His work is second to none, very meticulous and perfectly engineered to fit together.

Wednesday, 12 August 2015

WOYWW 323 - Another week has vanished in a flash,

It has been a while since I joined in with the wonderful Wednesday blog hop that is WOYWW, hosted by the lovely Julia at Stamping Ground.  Life has been somewhat hectic of late and I feel it is unfair to expect people to leave me comments when I know I do not have enough time to return the compliment.  I have been popping in and out to see what has been going on.


This is quite a photo heavy post today.  I am deeply addicted to parchment work at the moment.  It is something I have loved for a while, but the addiction has grown recently.  Many of you will know that I am also addicted to anything from Clarity Stamps and Barbara Gray.


They have recently brought out a revolutionary parchment kit, called the Groovi Plate, which enables total beginners to produce beautiful work within hours,  I already have most of the kit, but you can see my latest additions to my collection of plates.


My  other addiction, which has been a lifetime one, is for pencil crayons.  I now possess four complete sets from different companies, starting with my beloved Derwent.  That is in addition to all the watercolour pencils and pastels etc.

The box you can see here is one of my new acquisitions, the complete set of Caran D'Ache, which are Swiss, and totally luscious.  They are so smooth and easy to blend which makes them perfect for colouring parchment work.


The colours are so beautiful, I could sit and stroke them.  I am sure you know what I mean.  I do have one more new set which I will show you another time, which are the Fabel Castell Polichromos.  


Both these sets are expensive, but I was lucky enough to find brilliant offers and it would have been rude to refuse them, wouldn't it?

This final parchment picture was actually featured on my blog earlier this week, so I will not say too much about it.  I used three of the Groovi plates to put the design together, and then the crayons to colour lightly.  The backgrounds were from mop up sheets, but they just had the right colours.


I painted the canvas boards with two different shades of the Fresco Chalk paints, and I have become a real fan of those.  I learned some of the ways to use them when I went down to spend time on the Clarity Retreats in Kent last month.

I had hoped to spend some time during the week I was there doing some sight seeing in an area which was really totally new to me.  However, the weather had other ideas, being generally miserable, as you can see from this photo.  I ended up on the Monday morning at the viewpoint at the top of Ashdown Forest.  I am sure that the view is fantastic, but this photo actually shows more than I could actually see.  The clouds just sat down hard on any ground more than about 10 feet above sea level.


I actually gave up on the sight seeing and concentrated on the crafting and meeting up with lovely friends.  Once my session was over, I decided to cut and run, after a night of torrential rain with an appalling forecast.  I will try again next year and look forward to next year.

Meanwhile, I am looking forward to the second WOYWW crop later this year and meeting up with as many of you that can make it.  I will let you get back to Julia now and the links to all the other lovely blogs on show toady, and hope to get round as many of you as possible.


Sunday, 9 August 2015

Parchment - I love it

If you have seen any of my posts on Facebook, you will know by now that I am totally hooked on parchment at the moment.  It is not a new style for me.  I do not consider myself an expert but I have done a fair bit over the last few years.  Sadly, there do not seem to be any parchment classes anywhere within a reasonable distance, so all that I have learned has been from watching people like Christine Coleman and Tina Cox on Create and Craft, and from YouTube videos, and books etc.

Then Barbara Gray of Clarity Stamps picked up an idea from Maria Simms, and developed a revolutionary system for parchment called the Groovi Plate.  If you want to have a look at it, you will find it here -  http://www.claritystamp.co.uk/Groovi

Several people told me that it would be not good for me, I did not need it as I already did parching.  That idea was so wrong.  I have had a ball with the Groovi system and it has given me loads more ideas that I can play with.  Having been to a whole day workshop with Maria Simms, doing nothing but the Groovi plate, I was even more impressed to see that, no matter what level you are, you can come out at the end with beautiful pieces of work.  Even experienced parchers have really enjoyed using this kit and found uses for it.

This is my latest piece of parchment work, which is a mix of Groovi work, conversion of stamps into parchment.  The trellis and the grasses are done using the Groovi system, while the Blue Tit is a popular Clarity Stamp.


I stamped the bird onto a piece of tracing paper, which I could then flip over and then transfer to the piece of parchment, then added the trellis work around it.  The grasses are on a separate piece of parchment behind the trellis.  I used my ball tools to do the white work and emboss the grasses and the bird.  The colour was added with a combination of Derwent and Spectrum Noir pencils on the reverse of the parchment.  I did repeat the bird to decoupage it on the top of the flat image below.

Then I went through my stash of mop up pieces to find a good background which would show up the parchment best.  (Mop up pieces are created when you spritz the mixture of inks on your blending mat and then swish a piece of card around to pick up what it left - they are all different)  I trimmed the first one to fit the parchment and then found another to tone with it before sticking the whole thing together with brads.


I then decided to attach it all to one of the canvas boards which I had used for something else.  After sticking it irrevocably, I decided the colour of the canvas was definitely not right.  Fortunately, I had some new Fresco chalk paints in front of me and this blue turned out to be just what I wanted to pick up the blue in the mop up background.


The final stage was to find another colour to mount the whole thing on, which turned out to be another Fresco chalk paint.

Amazingly, by taking this to show my daughter today, I ended up with a commission from her neighbour to do something along the same lines.  Very gratifying to find that someone would like to buy something you have created.

This is a much better photo taken today on a proper camera.

Tuesday, 30 June 2015

Clarity Stamp Challenge for June 2015 - Boys, Boys, Boys

Once again, I am late putting my entry in for this month's Claritystamp challenge, which was Boys, Boys, Boys.  I put the blame fair and square on Barbara Gray.  Since taking delivery of the new Groovi Plate system, I have not wanted to put it down.  Parchment has taken over my life again.

Fortunately, my class on a Friday used the Clarity Sport set and I just took the brief a bit further. I did do the cut out of the central O (you would have been proud of me, Maria) and used my blade to do it.  Then I masked off that bit while I did the landscape with torn paper and the Clarity mat.  The sky was the Clarity cloud mask.  The whole aim was a misty, faded view, with the stamped images done in second generation ink.

I did darken up the sky and grass in the centre O around the cyclist.  The large Sport was heat embossed in a distress type powder, which does not really show very well.


In additon to the normal Friday class, I went down to the class on Saturday morning at Pink Tulip Creations where we did two cards, as you can see below.  Because we were using Brushos for the second card, and could not all do that at the same time, the two cards were running at the same time.  The first one was using the Stampendous Ranunculus, which I think is very like the Charles Rennie Mackintosh rose as you can see in this illustration.
Most people painted their flowers, but I decided to play with the blendable pencils.  I used the Derwent as I have a small set that fits in my bag and will do most things.    Unwittingly, I matched the colours to the top I was wearing, although the others thought it was deliberate.  


The Brushos were really a taster session for those that have never used them, but it was a very effective technique, much better than this photo shows.  We punched large circles out of the dried off Brusho sheet and then stamped the heads of this Lavinia stamp onto the circles with Archival, and then glittered the open tips of the flowers.  The whole thing was stamped onto the main card and the
flower circles glued on top.

This card is so much more pretty in real life as the sparkle just does not show here.


Wednesday, 24 June 2015

WOYWW 316

 The speed of the passing of 2015 is positively terrifying.  I am sure New Year was only last week, although I do remember going down to the Crop in May.  I do not seem to be doing very well at blogging this year either.  A quick blink of the eyes and another Wednesday is over and done with.  If you are wondering why Wednesday is a significant day of the week, then I will leave it to our Julia to explain far better than I all about WOYWW (What's On Your Workdesk Wednesday).

I am still trying to get all my stuff back into my craft room where it belongs.  However, that ambition is not helped by certain people bringing out new "must have" products and the NEED to try them out and see just what I can do with them.   These pictures of my temporary desk/picnic table show some of my latest acquisitions.


The major new product is the recently launched Groovi plate system for parchment from Clarity.  Although I have done parchment for several years, this new system, designed for beginners and experienced parchers alike, has been impossible to leave alone.  The little picture was partially done on the Groovi plate, although the central design was transferred from this week's Mindfulness colouring download from Barbara Gray.  I mounted it on a black painted canvas board.


I also went to a demo of Sissix products down at our local craft shop, Pink Tulip Creations, which was excellent.  The demonstrator, Pete Hughes, certainly did a great job and I learned a lot of hints and tips and was reminded of a lot more.  As you can see, I did not leave it at just watching the demo.
 

The Colour Burst powders, still in their packets, are very similar to Brushos, but a little more controllable.  I need to get them out and play very soon, so I am having to be very strong and resist while I finish resorting my stamps again.

How many of you are heading down to Burbage again later this year?  I am really looking forward to that trip and hope to meet up with lots of you then.

Right now, it is time I pointed you in the direction of our hostess with the mostest, Julia, who will send you on round the other desks on show this week.  I hope to visit as many of you as possible during the rest of the week.  Have a great week, all of you.

Friday, 29 May 2015

Clarity Stamp challenge for May - Clocks

The brief for this challenge was to explore the different ways of incorporating clocks into your artwork.  From the moment I read this, all I could think of was this song and my entry comes directly from that idea.
 
 
All the stamps are from Clarity.  It is just the sentiment that does not come from Clarity but is just the title of the song, sung by Stanley Holloway in "My Fair Lady".

The clock part comes from the use of two of the small fob watches.  The round full face one made the wheels of the carriage - hence the on time reference.  The side facing ones, I had the idea of blacking out the faces and turning into people forming a guard of honour holding staffs.  The winders became their heads, onto which I drew top hats.  The bride and groom came from the new wedding Wee Folk.  The fence posts were created using the trunks of the trees in the background.

I actually made two cards to see which I preferred.  The first one, which is also the one I have decided to use as my entry, was done on white card, while the second was done on cream card.  I like both, the second being more moody, in my opinion.  However, the texture of the cream card meant that the stamped image needed work to fill in the gaps.

In both, the trees and the church were coloured in with blendable pencils, which I also used to edge the sentiment on each.

Now I have done this card as my entry, I will now go back and look at all the other entries.  I never look until I have finished in case it changes my ideas.

Wednesday, 27 May 2015

WOYWW 312 - six whole years of blogging

 What a great achievement - 6 whole years of blogging.  Well done, Julia.  You deserve a medal and our gratitude for putting up with us all for so long.  Thank you for all you do to keep us all going.

I will try to keep it short this week, as we all should but seldom manage.  My first photo is of the treetops that I can see from my craft room.  It just looked so beautiful this week with the different colours of foliage.

The next three photos are less pretty, but do show something of what I have been doing recently.  The things you can see are carefully placed to hide things that you are not allowed to see yet.   There are lots of backgrounds waiting for further inspiration.  Some are created using marbling with alcohol inks on water, and are on a variety of papers and card.  Others are the result of mopping up all the remaining ink left on the blending mat after an inky session.  Often, these mopping up pieces are the most useful as backgrounds.  I am often horrified to see people at classes just ignoring this bounty and washing it away.  What a shame and a waste of valuable inspiration.
 This batch were done on plain white card and a few on the ultra shiny Chromo card.  I like both sets of results.  The biggest difference is in what you can then use to colour in your stamping as coloured pencils work less well on the shiny card.


My final picture also shows the cover of the programme for this year's Land Rover National event which was held not far away at Eastnor Deer Park.  The picture covering the front and back cover shows an event from the past and is believed to be drivers lining up for a scenic drive round the estate, led by its former owner Major Ben Hervey Bathurst,  Note the lack of seat belts, roll cages and roof in many cases,  No Health and Safety in those days.

Now my caravan is finally sold, I only slipped over to see friends for the day, but it is a beautiful place to camp/caravan.

If anyone would like to swap ATCs, I do have a few spare ones apart from the one needed for the official swap, so just let me have your snail mail address and I will get them off to you asap.

Happy Birthday to all you deskers.